- How to manage secrets using Hashicorp Vault – HA using DynamoDB
- Addressing secrets compliance using Hashicorp Vault Secrets Engines
Vault Secrets Engines
Below is an excerpt from the Vault doc.
Vault Secrets Engines are the components which store, generate or encrypt data. Some secrets engines simply store and read data – like encrypted Redis/Memcached. Other secrets engines connect to other services and generate dynamic credentials on demand.
Secrets engines are enabled at a “path” in Vault. When a request comes to Vault, the router automatically routes anything with the route prefix to the secrets engine. In this way, each secrets engine defines its own paths and properties.
One of the case we need to address as part of the scenario we discussed in the previous part is to retrieve the secrets dynamically. The AWS and Database secrets engines generate dynamic credentials on demand. We can make use of this to get AWS API Keys and Database passwords dynamically rather than storing a static API Key or password in a file.
Vault Login
In order to configure vault using CLI, first we need to authenticate with the vault server. There are various authentication backends with which we can authenticate with vault. We will discuss those later. For now, we can authenticate using our root id which we received during the unseal process. Login to both the vault nodes and run the below command.
$ vault login

Token (will be hidden): < Enter your Root Token Here >
Success! You are now authenticated. The token information displayed below
is already stored in the token helper. You do NOT need to run "vault login"
again. Future Vault requests will automatically use this token.

Key Value
--- -----
token 06083517-1adc-71e9-7c81-a012c804cb8a
token_accessor 481b6579-71d7-f4df-27bb-e2553042de09
token_duration ∞
token_renewable false
token_policies [root]
Note:
Vault can be configured using CLI and HTTP API. In this article, we will predominantly use CLI and use HTTP API whenever there is a need.
While using CLI, following steps can be performed in any of the vault node ( vault-a or vault-b ) since the stand-by node will automatically forward the commands to active node. It is assumed that you have authenticated using your root token in the vault server.
While using HTTP API, we need to pass the token that has the privilege to perform the operation. For eg, we will use the root token assigned using the environment variable $VAULT_TOKEN while executing the curl command.
AWS Secrets Engine
This engine will generate AWS access credentials dynamically based on IAM policies. The AWS IAM credentials are time-based and are automatically revoked when the Vault lease expires. We need to enable the AWS secret engine before we can use it.
Enable and configure AWS Secrets Engine:
Run the below command in any of the vault node to enable AWS secret engine,
$ vault secrets enable aws
Success! Enabled the aws secrets engine at: aws/
You can verify if the engine was enabled by running,
$ vault secrets list

Path Type Description
---- ---- -----------
aws/ aws n/a
cubbyhole/ cubbyhole per-token private secret storage
identity/ identity identity store
secret/ kv key/value secret storage
sys/ system system endpoints used for control, policy and debugging
The other secret backends are enabled by default.
By default, the engine will mount at the name of the engine (aws in this case). You can use -path argument to enable secrets engine at different path. For eg, if you have multiple aws accounts, you can use
$ vault secrets enable -path="aws-account1" aws

$ vault secrets enable -path="aws-account2" aws
Next we need to configure vault to communicate with our AWS account to generate the IAM credentials.
$ vault write aws/config/root \
    access_key=AKAWJWVN8Z4FOFT7NMAS \
    secret_key=Z2nm059hgMVo4BTT5xOs5nHLeLXA6lar7ZJ3Lt7p \
    region=ap-south-1
You can provide the access and secret key of the IAM user which has enough privilege to generate the IAM credentials. Providing AWS root credential is not recommended. You can also specify the credentials via the standard AWS environment credentials, shared file credentials or IAM role/ECS task credentials.
Create Roles
The next step is to create a role that maps a name in Vault to a policy or policy file in AWS. When users generate credentials, they are generated against the corresponding role.
For this example, we can create two roles.
– One that has full access to a specific S3 bucket
– One that has EC2 Read only access
Create a file named my-bucket-full-policy.json with the below content.
{
    "Version": "2012-10-17",
    "Statement": [
        {
            "Effect": "Allow",
            "Action": [
                "s3:GetBucketLocation",
                "s3:ListAllMyBuckets"
            ],
            "Resource": "arn:aws:s3:::*"
        },
        {
            "Effect": "Allow",
            "Action": "s3:*",
            "Resource": [
                "arn:aws:s3:::my-bucket",
                "arn:aws:s3:::my-bucket/*"
            ]
        }
    ]
}
Assign the above policy to a role,
$ vault write aws/roles/my-bucket-full [email protected]
Instead of using the inline policy, it is also possible to create a role referencing an existing AWS policy’s full ARN. We can create a role named ec2-read for EC2 Read access by referencing the AWS policy’s ARN as below,
$ vault write aws/roles/ec2-read arn=arn:aws:iam::aws:policy/AmazonEC2ReadOnlyAccess
Generate Credential
After the secrets engine is configured and a user/machine has a Vault token with the proper permission, it can generate credentials.
We can generate a new credential by reading from the /creds endpoint with the name of the role
Using CLI:
Dynamic credential for ‘my-bucket’ full access:
$ vault read aws/creds/my-bucket-full

Key Value
--- -----
lease_id aws/creds/my-bucket-full/835a8f74-33aa-7e70-4d0d-22890e4c02fe
lease_duration 768h
lease_renewable true
access_key AKIAJ25ZFWVT7S5KPFAA
secret_key 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
security_token <nil>
Dynamic credential for EC2 Read Only Access:
$ vault read aws/creds/ec2-read

Key Value
--- -----
lease_id aws/creds/ec2-read/48a9fe9e-a754-ed0e-ff76-906b9e19d214
lease_duration 768h
lease_renewable true
access_key AKIAIUXDZH6LOBLUSNKA
secret_key GDaQMi+XJEQUuxnlBMq10nw3IRq4C2dkhbfW13CA
security_token <nil>
The lease_duration indicates how long this credential is valid. This value can be tuned based on your need.
Using HTTP API:
Realistically, communication with Vault mostly takes place through the API. Applications and clients connect to Vault through API’s to fetch credentials unlike the step we performed using CLI.
Dynamic credential for ‘my-bucket’ full access:
The below commands can be executed from any node that has access to the vault server. First, let’s assign the token which has the necessary access to a variable.
export VAULT_TOKEN=<Root Token id>
Execute the curl command against the endpoint that generates the credential.
$ curl --header "X-Vault-Token:$VAULT_TOKEN" \
http://<A-Record of Internal Load Balancer>/v1/aws/creds/my-bucket-full | jq '.'

{
 "request_id": "4b4c447d-cf2f-c3e7-661c-628c423e8a0f",
 "lease_id": "aws/creds/my-bucket-full/0044716f-9526-0e9c-9ecd-5fa6d4cd1a58",
 "renewable": true,
 "lease_duration": 2764800,
 "data": {
 "access_key": "AKIAI6MCPMJVF5P37RPA",
 "secret_key": "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",
 "security_token": null
 },
 "wrap_info": null,
 "warnings": null,
 "auth": null
}
We have used jq for better formatting of the output
Dynamic credential for EC2 Read Only Access:
$ curl --header "X-Vault-Token:$VAULT_TOKEN" \
http://<A-Record of Internal Load Balancer>/v1/aws/creds/ec2-read | jq '.'

{
  "request_id": "bd8a22f7-25cd-c92a-3e0e-77e226c32a99",
  "lease_id": "aws/creds/ec2-read/96b7a82f-7122-a9ca-6462-af612dd1e284",
  "renewable": true,
  "lease_duration": 2764800,
  "data": {
    "access_key": "AKIAJZ55L3UFOL3BPXSQ",
    "secret_key": "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",
    "security_token": null
  },
  "wrap_info": null,
  "warnings": null,
  "auth": null
}
Revoking Secret
By default Vault will automatically revoke this credential after 768 hours ( lease_duration ). We can also revoke the secret manually if needed. Once the secret is revoked, the access keys are no longer valid.
Using CLI
$ vault lease revoke aws/creds/my-bucket-full/835a8f74-33aa-7e70-4d0d-22890e4c02fe

Success! Revoked lease: aws/creds/my-bucket-full/835a8f74-33aa-7e70-4d0d-22890e4c02fe
Using HTTP API
$ curl --header "X-Vault-Token:$VAULT_TOKEN" --request PUT \
http://<A-Record of Internal Load Balancer>/v1/sys/revoke/aws/creds/ec2-read/48a9fe9e-a754-ed0e-ff76-906b9e19d214
Database Secrets Engine
The database secrets engine similar to aws secrets engine, generates database credentials dynamically based on configured roles. It works with a number of different databases through a plugin interface. Vault supports multiple Database backends such as Cassandra, MongoDB, MySQL, MariaDB, PostgreSQL etc. In this example, we will see how we can configure MySQL backend.
Enable and configure database secrets engine
$ vault secrets enable database

Success! Enabled the database secrets engine at: database/
Configure vault with proper plugin and connection information
$ vault write database/config/app1-database \
 plugin_name=mysql-database-plugin \
 connection_url="root:<Mysql_password>@tcp(<Mysql_host>:3306)/" \
 allowed_roles="app1-read, app1-write"
We are creating a database configuration with the name app1-database assuming we are configuring this for an application named app1. In the connection url, you need to pass the connection details such as the id with which vault will connect to the database and the database host. We also pre-assign two roles which we will create in the next step.
Create Role
Configure a role that maps a name in Vault to an SQL statement to execute to create the database credential. For this example we will create two roles app1-read and app1-write. The app1-read role will have READ access to app1 database and app1-write role will have write access to the app1 database.
app1-read role:
$ vault write database/roles/app1-read \
 db_name=app1-database \
 creation_statements="CREATE USER '{{name}}'@'%' IDENTIFIED BY '{{password}}';GRANT SELECT ON app1.* TO '{{name}}'@'%';" \
 default_ttl="1h" \
 max_ttl="24h"
app1-write role:
$ vault write database/roles/app1-write \
    db_name=app1-database \
    creation_statements="CREATE USER '{{name}}'@'%' IDENTIFIED BY '{{password}}';GRANT ALL ON app1.* TO '{{name}}'@'%';" \
    default_ttl="1h" \
    max_ttl="24h"
Make sure you pass the correct db_name. The name of the database config we created in the previous step was app1-database. creation_statements is where you can provide the relevant access for the role. default_ttl of 1h indicates this credential is valid for 1 hour. This can be renewed if needed but it cannot exceed 24 hours which is defined by the max_ttl. After 24h, the credential has to be rotated.
Generate Credential
Generate a new credential by reading from the /creds endpoint with the name of the role.
Using CLI:
Dynamic credential for app1-read role
$ vault read database/creds/app1-read

Key                Value
---                -----
lease_id           database/creds/app1-read/066e8b8c-e0fe-86f9-6921-282b7f1e0aa0
lease_duration     1h
lease_renewable    true
password           A1a-21881p86s9w8wvwp
username           v-root-app1-read-4xur9prsvvpx3xt
Dynamic credential for app1-write role
$ vault read database/creds/app1-write

Key                Value
---                -----
lease_id           database/creds/app1-write/76df81aa-af05-a2f3-d5f5-9882a1552078
lease_duration     1h
lease_renewable    true
password           A1a-0r31vy92wypw16x6
username           v-root-app1-write-v0w8326zp1pzqt
Using HTTP API:
Dynamic credential for app1-read role
$ curl --header "X-Vault-Token:$VAULT_TOKEN" \
http://<A-Record of Internal Load Balancer>/v1/database/creds/app1-read | jq '.'

{
  "request_id": "ff54bb75-32d1-50e4-bd9f-74d10498b933",
  "lease_id": "database/creds/app1-read/261990a8-3d65-2396-e893-8bef722d1c76",
  "renewable": true,
  "lease_duration": 3600,
  "data": {
    "password": "A1a-wt9q0qr95815s789",
    "username": "v-root-app1-read-0388wqw94qzvpv3"
  },
  "wrap_info": null,
  "warnings": null,
  "auth": null
}
Dynamic credential for app1-write role
$ curl --header "X-Vault-Token:$VAULT_TOKEN" \
http://<A-Record of Internal Load Balancer>/v1/database/creds/app1-write | jq '.'

{
  "request_id": "0ae1f410-4e20-04f0-6278-e47b44d062de",
  "lease_id": "database/creds/app1-write/916a7e2a-a8b3-ec99-2b95-56e5d70ea7a9",
  "renewable": true,
  "lease_duration": 3600,
  "data": {
    "password": "A1a-735v5u74uu9x5zw5",
    "username": "v-root-app1-write-tsuwsxvvu8q7t4"
  },
  "wrap_info": null,
  "warnings": null,
  "auth": null
}
Key/Value Secrets Engine
The kv secrets engine is used to store arbitrary secrets unlike the other two engines we discussed above. Writing to a key in the kv backend will replace the old value. Key names must always be strings. If you write non-string values directly via the CLI, they will be converted into strings. However, you can preserve non-string values by writing the key/value pairs to Vault from a JSON file or using the HTTP API.
For this example, let us consider we have two teams. Dev and QA. These two teams need to share passwords within themselves. Also the Lead of each team has additional passwords which none of their team members can see.
First let us add some secrets to simulate this scenario. Later using LDAP backend, we can see how we can apply the ACL to enforce restriction.
The kv secret engine is enable by default and mounted at /secret
$ vault secrets list

Path Type Description
---- ---- -----------
aws/ aws n/a
cubbyhole/ cubbyhole per-token private secret storage
database/ database n/a
identity/ identity identity store
secret/ kv key/value secret storage
sys/ system system endpoints used for control, policy and debugging
Add common secret for Dev team
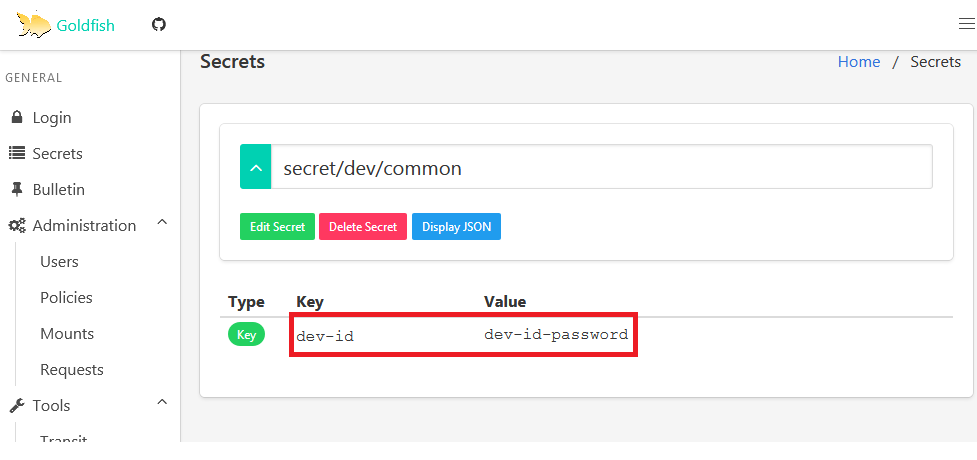
$ vault write secret/dev/common dev-id=dev-id-password

Success! Data written to: secret/dev/common
We are storing the common secrets for dev at secret/dev/common. We are storing the username as dev-id and password as dev-id-password
Add Dev Lead’s secret
$ vault write secret/dev/lead dev-lead-id=dev-lead-password

Success! Data written to: secret/dev/lead
We are storing the secret for Dev Lead at secret/dev/lead.
We can follow the same steps for adding secrets for QA
$ vault write secret/qa/common qa-id=qa-id-password

Success! Data written to: secret/qa/common
$ vault write secret/dev/lead dev-lead-id=dev-lead-password

Success! Data written to: secret/dev/lead
Read kv secrets
We can use the vault read command along with the path name to retrieve secrets
$ vault read secret/dev/common

Key                 Value
---                 -----
refresh_interval    768h
dev-id              dev-id-password
In the previous examples, we have used root token id to authenticate to retrieve the secrets from vault. But this will not be the case in real time and this is just to get you started with understanding how dynamic secrets work. We will see how we can make users and application fetch these credentials when we discuss about auth methods.
Policies
Policies provide a declarative way to grant or forbid access to certain paths and operations in Vault. Policies in Vault control what a user can access.. We will be mapping these policies with the auth methods we will create in the next section.
Policy for AWS Secrets Engine:
In the AWS Secrets Engine, we created two roles. my-bucket-full and ec2-read. We can provide policies that provide read access to these roles and attach it as part of the auth methods we will create later.
Create a file named policy-my-bucket-full.hcl and copy the below content. Policies are authored in HCL(Hashicorp Configuration Language), but it is JSON compatible.
path "aws/creds/my-bucket-full" {
    capabilities = ["read"]
}
Create a file named policy-ec2-read.hcl and copy the below content.
path "aws/creds/ec2-read" {
    capabilities = ["read"]
}
We need to apply these policies to vault by running the below command,
$ vault policy write policy-my-bucket-full policy-my-bucket-full.hcl

Success! Uploaded policy: policy-my-bucket-full
$ vault policy write policy-ec2-read-policy policy-ec2-read-policy.hcl

Success! Uploaded policy: policy-ec2-read-policy
We have named the policy as policy-my-bucket-full and policy-ec2-read-policy
Policy for Database Secrets Engine:
We have created two roles for Database Secrets Engine, app1-read and app1-write. We can create policies for the same.
Create a file name policy-app1-read.hcl with the below content.
path "database/creds/app1-read" {
    capabilities = ["read"]
}
Create a file named policy-app1-write.hcl with the below content
path "database/creds/app1-write" {
    capabilities = ["read"]
}
Apply these policies by running the below commands,
$ vault policy write policy-app1-read policy-app1-read.hcl

Success! Uploaded policy: policy-app1-read
$ vault policy write policy-app1-write policy-app1-write.hcl

Success! Uploaded policy: policy-app1-write
Policy for kv Secrets Engine:
We have stored four secrets as part of kv. Out of four, the ones under /secret/dev/common and /secret/qa/common are share between teams. Other should be accessible only by the corresponding team leads.
First lets create policies which provide access to teams in common. Create a file named policy-dev-common.hcl with the below content.
path "secret/dev/common" {
    capabilities = ["list","read"]
}
Create a file named policy-qa-common.hcl with the below content.
path "secret/qa/common" {
    capabilities = ["list","read"]
}
For leads, we need to provide all access for the respective paths. Create a file named policy-dev-lead.hcl with the below content.
path "secret/dev/common" {
    capabilities = ["create", "read", "update", "delete", "list"]
}

path "secret/dev/lead" {
    capabilities = ["create", "read", "update", "delete", "list"]
}
For QA lead, create a file named policy-qa-lead.hcl with the below content.
path "secret/qa/common" {
    capabilities = ["create", "read", "update", "delete", "list"]
}

path "secret/qa/lead" {
    capabilities = ["create", "read", "update", "delete", "list"]
}
Apply these policies by running the write command,
$ vault policy write policy-dev-common policy-dev-common.hcl

$ vault policy write policy-qa-common policy-qa-common.hcl

$ vault policy write policy-dev-lead.hcl policy-dev-lead.hcl

$ vault policy write policy-qa-lead.hcl policy-qa-lead.hcl
Auth Methods
Authentication in Vault is the process by which user or machine supplied information is verified against an internal or external system. Vault supports multiple auth methods including GitHub, LDAP, AppRole, and more. Each auth method has a specific use case.
Before a client can interact with Vault, it must authenticate against an auth method. Upon authentication, a token is generated. This token is conceptually similar to a session ID on a website. The token may have attached policy, which is mapped at authentication time.
AppRole
The approle auth method allows machines or apps to authenticate with Vault-defined roles. This auth method is oriented to automated workflows (machines and services), and is less useful for human operators. AppRole auth method was specifically designed to be used by machines or applications to login to Vault.
The AppRole auth method allows multiple “roles” to be defined corresponding to different applications, each with different levels of access. To authenticate with Vault the application is assigned a static Role ID and a dynamically generated Secret ID which are both required to login and fetch a Vault token.
First lets enable the AppRole auth method
$ vault auth enable approle
We can see an example on how to make application use the Approle to use S3 and Database. We already created various roles while working on AWS and Database Secretes Engine. We will be using those roles in this example. We can assume two cases
– Case1: A bash script requires access to s3bucket to upload backup data
– Case2: An application needs read access to a specific database ( app1 database in our case )
We have already created policies that provide relevant access to roles. We will be using these policies while created roles in Approle.
The two policies that we will make use of for the above case is, policy-my-bucket-full and policy-app1-read.
Create a named role,
$ vault write auth/approle/role/my-bucket-full token_ttl=60m \
   token_max_tll=120m bound_cidr_list=10.0.0.0/16 \
   policies=policy-my-bucket-full

$ vault write auth/approle/role/app1-read token_ttl=60m \
   token_max_tll=120m bound_cidr_list=10.0.0.0/16 \
   policies=policy-app1-read
We have created two approle roles for s3bucket and DB access. We are restricting access to this auth role by bounding it to a specific CIDR. For other available parameter for AppRole, you can refer the AppRole documentation
Fetch the RoleID of the AppRole,
$ vault read auth/approle/role/my-bucket-full/role-id

Key        Value
---        -----
role_id    897a1bfa-b7cc-4a16-3501-7db76b4e019a
$ vault read auth/approle/role/app1-read/role-id

Key        Value
---        -----
role_id    3bc2de32-5982-714f-785e-1432f35d7857
Get a SecretID issued against the AppRole,
$ vault write -f auth/approle/role/my-bucket-full/secret-id

Key                   Value
---                   -----
secret_id             d4ce32b6-50a0-efb4-0104-9c41a7372830
secret_id_accessor    63533fd3-8972-fd41-a497-3b381acb9cbf
$ vault write -f  auth/approle/role/app1-read/secret-id

Key                   Value
---                   -----
secret_id             594ff4fb-1bd9-8dea-b38f-0808a2f06a34
secret_id_accessor    de6adb0c-793e-93a7-fedb-c5eff37ca736
Note: In a more restricted environment, the secret_id and role_id might be generated using intermediate hops (dedicated services like CM tools ) individually and will not be able to fetch vault tokens themselves. The App will then use the bootstrapped credentials.
Case1: Script requiring access for S3 bucket.
We have the necessary credentials to connect to AppRole and retrieve the credentials. The bash script will be something like below,
#/bin/bash

#Setting the RoleId and SecretID
role_id="897a1bfa-b7cc-4a16-3501-7db76b4e019a"
secret_id="d4ce32b6-50a0-efb4-0104-9c41a7372830"

#Generating Vault token using role_id and secret_id
VAULT_TOKEN=`curl -X POST -d '{"role_id":"'"${role_id}"'","secret_id":"'"${secret_id}"'"}' http://<A-Record of Internal Load Balancer>/v1/auth/approle/login | jq -r .auth.client_token`

#Retrieving Dynamically generated Access and Secret key
response=$(curl -H "X-Vault-Token:${VAULT_TOKEN}" -X GET http://<A-Record of Internal Load Balancer>/v1/aws/creds/my-bucket-full)

#Parsing the json response to set Access and Secret key variable
AWS_ACCESS_KEY=`echo "${response}" | jq -r .data.access_key`
AWS_SECRET_KEY=`echo "${response}" | jq -r .data.secret_key`

...

<Logic to upload backup to my-bucket S3 bucket>

...
Case2: App needs read access to a specific database
Applications can be written to dynamically fetch credentials from vault. You can take a look at sample Vault-aware application to get an idea. For this example, we assume that application will make use of environment variable for accessing the database.
#/bin/bash

#Setting the RoleId and SecretID
role_id="3bc2de32-5982-714f-785e-1432f35d7857"
secret_id="594ff4fb-1bd9-8dea-b38f-0808a2f06a34"

#Generating Vault token using role_id and secret_id
VAULT_TOKEN=`curl -X POST -d '{"role_id":"'"${role_id}"'","secret_id":"'"${secret_id}"'"}' http://<A-Record of Internal Load Balancer>/v1/auth/approle/login | jq -r .auth.client_token`

#Retrieving Dynamically generated Access and Secret key
response=$(curl -H "X-Vault-Token:${VAULT_TOKEN}" -X GET http://<A-Record of Internal Load Balancer>/v1/database/creds/app1-read)

#Parsing the json response to set Access and Secret key variable
export DB_USERNAME=`echo "${response}" | jq -r .data.username`
export DB_PASSWORD=`echo "${response}" | jq -r .data.password`
The above script can be made to run in cron based on the ttl of the credential retrieved. The application can use the env variable DB_USERNAME and DB_PASSWORD to access the database.
With this we have addressed the requirement to generate dynamic secrets, secrets rotation and revocation.
LDAP Auth Method
The ldap auth method allows authentication using an existing LDAP server and user/password credentials. This allows Vault to be integrated into environments using LDAP without duplicating the user/pass configuration in multiple places.
The mapping of groups and users in LDAP to Vault policies is managed by using the users/ and groups/ paths.
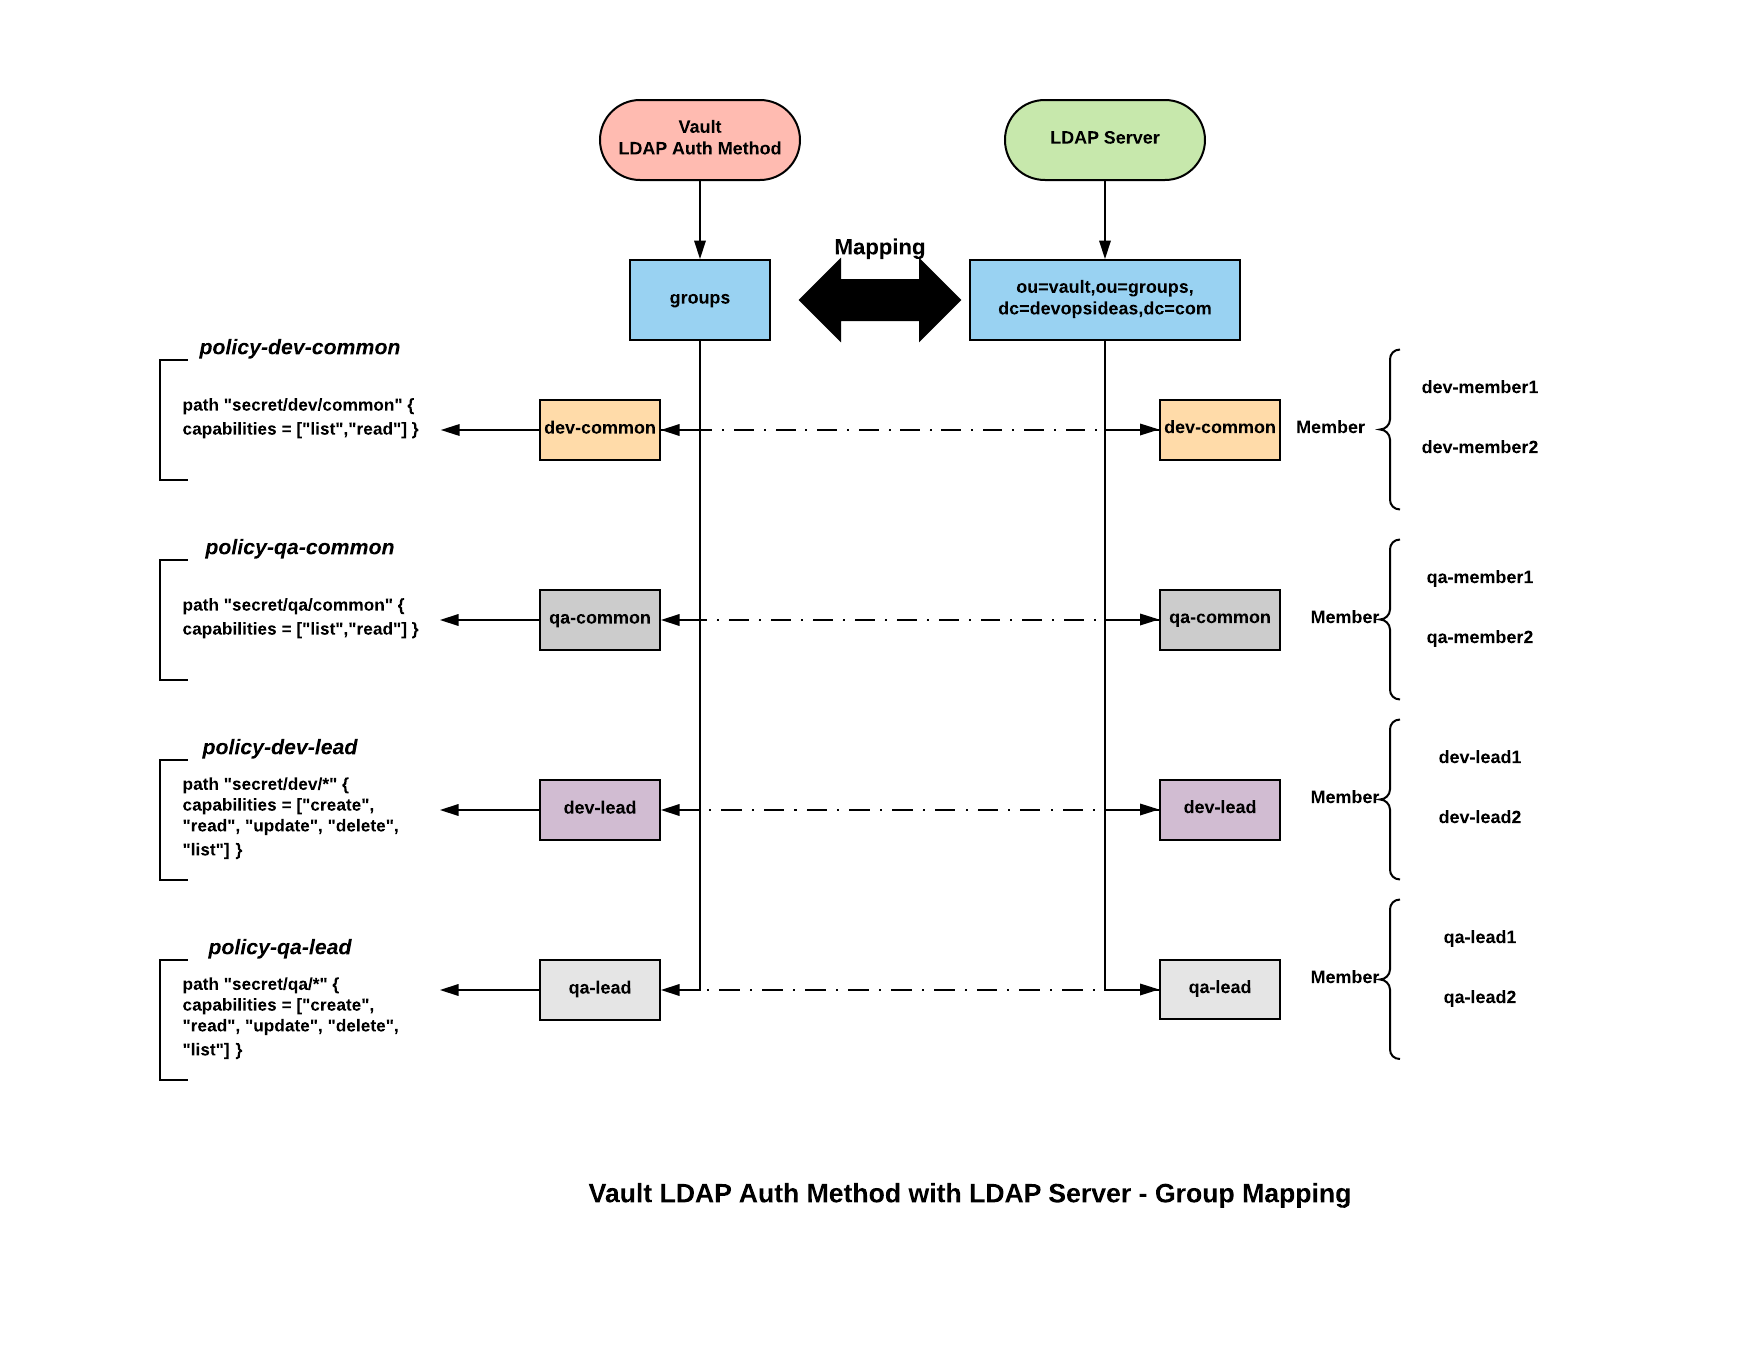
While discussing kv secrets engine, we discussed a scenario about sharing secrets within dev and qa team. The above diagram depicts the architecture for the same. We need to make sure the name of the group created as part of LDAP auth method is identical to the group name in LDAP server. Also we are assuming the groups in LDAP server are within ou=vault,ou=groups,dc=devopsideas,dc=com.
Enable the LDAP auth method
$ vault auth enable ldap
Configure connection details for LDAP
$ vault write auth/ldap/config url="ldap://ldap.devopsideas.com" \
userattr="cn" userdn="ou=people,dc=devopsideas,dc=com" \
groupdn="ou=vault,ou=groups,dc=devopsideas,dc=com" \
groupfilter="(member={{.UserDN}})" \
groupattr="cn" \
binddn="cn=<bind_dn>" \
bindpass='<bind_password>' \
[email protected] \
insecure_tls=true \
starttls=true
url – Provide the url of your LDAP server
userattr – User attribute to be used for authentication. Usually cn or uid
userdn – Base DN under which to perform user search
groupdn – LDAP search base to use for group membership search
groupfilter – Filter to match Group membership
groupattr – LDAP attribute to follow on objects returned by groupfilter in order to enumerate user group membership
bindn – Distinguished name of object to bind when performing user and group search
bindpass – Bind Password
certificate – CA certificate to use when verifying LDAP server certificate
insecure_tls – Set to true if using Self Signed Certificate
starttls – Set to true if Start TLS is enabled in LDAP server
READ: Openldap Tutorial – Practical Realtime Implementation and Integration
LDAP Auth Method Group -> Policy Mapping:
Next we need to create groups for LDAP Auth Method and map it against policy which we created earlier. Based on our scenario and the architecture diagram, we can create four groups – dev-common, qa-common, dev-lead, qa-lead
Create four groups and map the relevant policy by running the below command,
$ vault write auth/ldap/groups/dev-common policies=policy-dev-common
$ vault write auth/ldap/groups/qa-common policies=policy-qa-common
$ vault write auth/ldap/groups/dev-lead policies=policy-dev-lead
$ vault write auth/ldap/groups/qa-lead policies=policy-qa-lead
Create groups with identical name in the LDAP server and add members to it. If you are new to LDAP, you can go through this complete tutorial about implementing openldap with realtime use case.
Goldfish Vault UI
Assuming that we have created groups and added members in the LDAP server, next we can install goldfish which is an UI for vault. Unlike other auth methods, LDAP auth method will most probably used by users and hence providing them with an UI to retrieve and update secrets will become necessary.
Vault Enterprise comes up with inbuilt UI. If you are opting for the opensource version, you can make use of multiple UI’s available for vault. We will be using Goldfish which is an opensource vault UI.
You can refer Goldfish Production Deployment for steps on how to install and configure it. Make sure you install goldfish executable in all vault nodes.
Recommended configuration is to make goldfish run in port 8000 and use nginx as revrese proxy. You can refer Nginx Reverse Proxy for this.
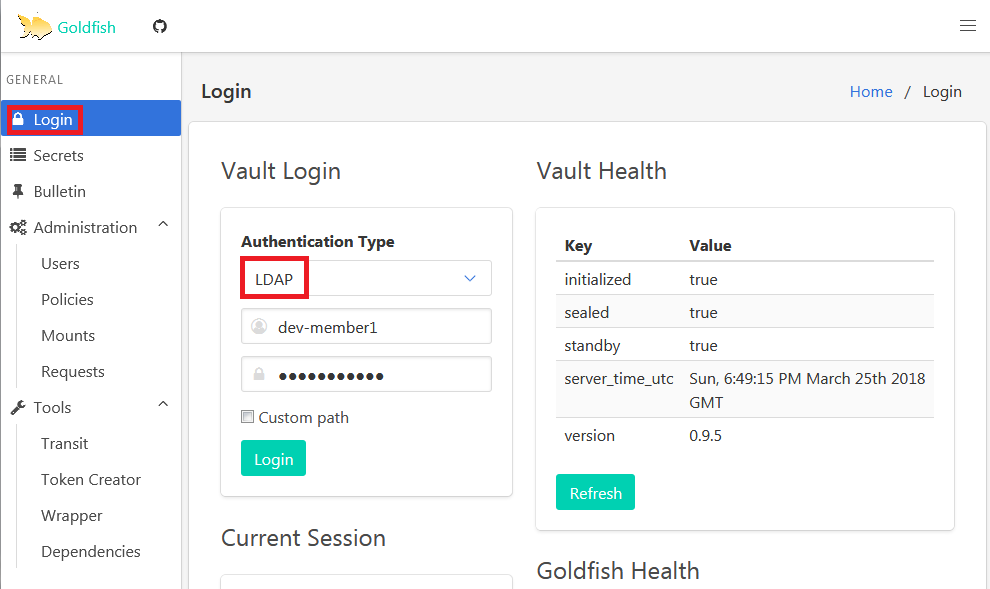
Once you setup Goldfish, Click login and select authentication type as LDAP and enter your LDAP credentials. In this case dev-member1 will be part of dev-common group.
If the credential is correct and the id is part of an authroized group, you’ll retrieve a token.
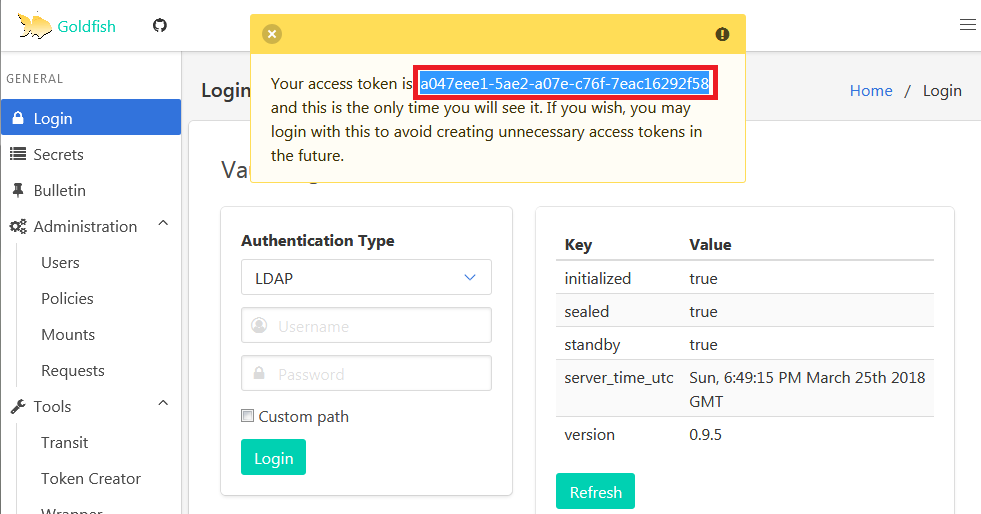
Next select Token from Authenticaton Type dropdown and paste the token received in the previous step.
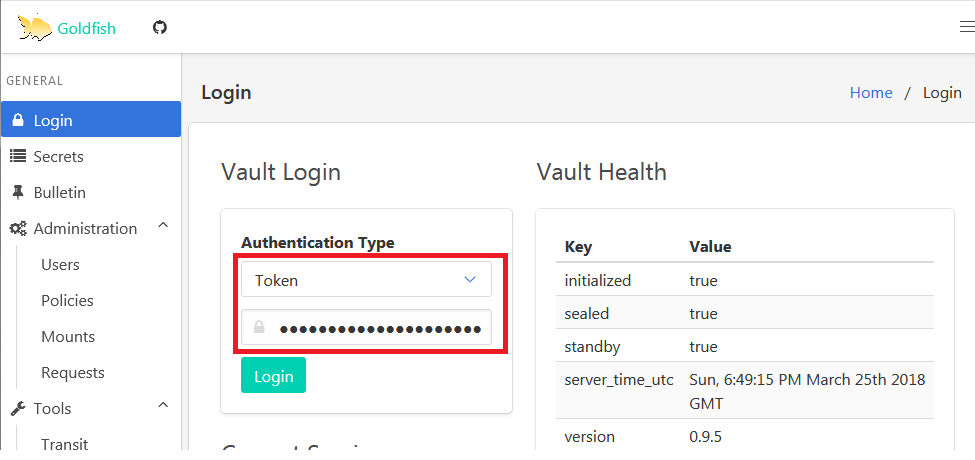
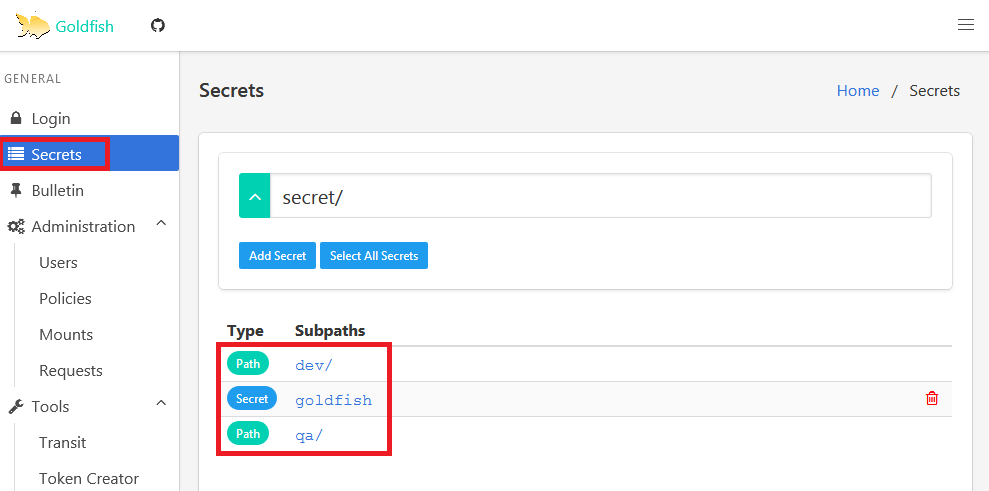
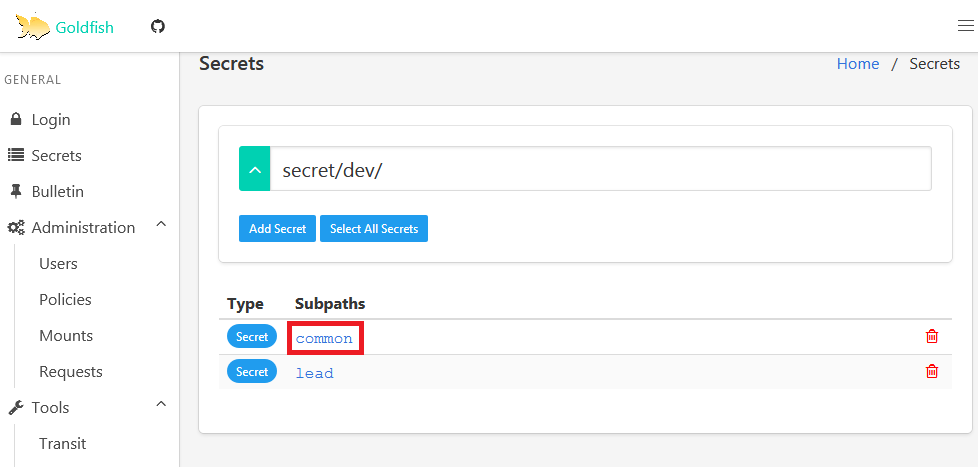
You’ll be logged in successfully. Click on Secrets and you’ll see the list of available paths and secret.
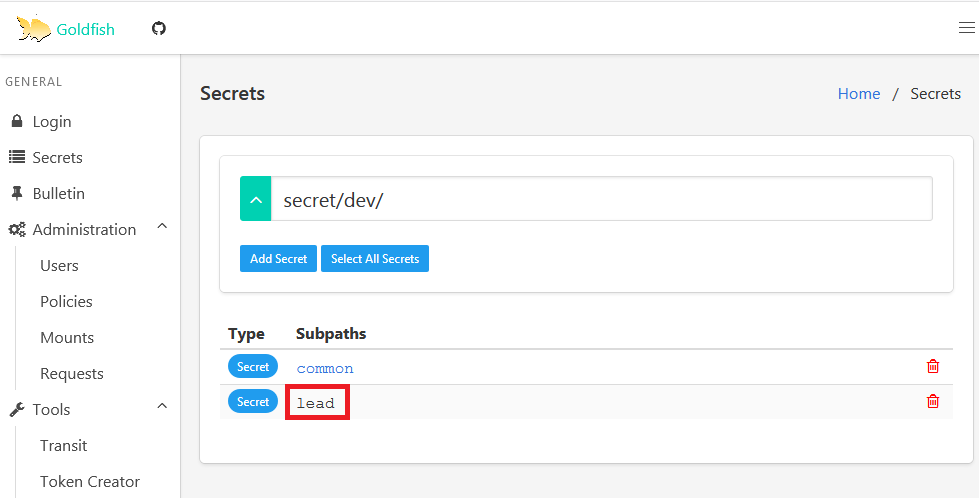
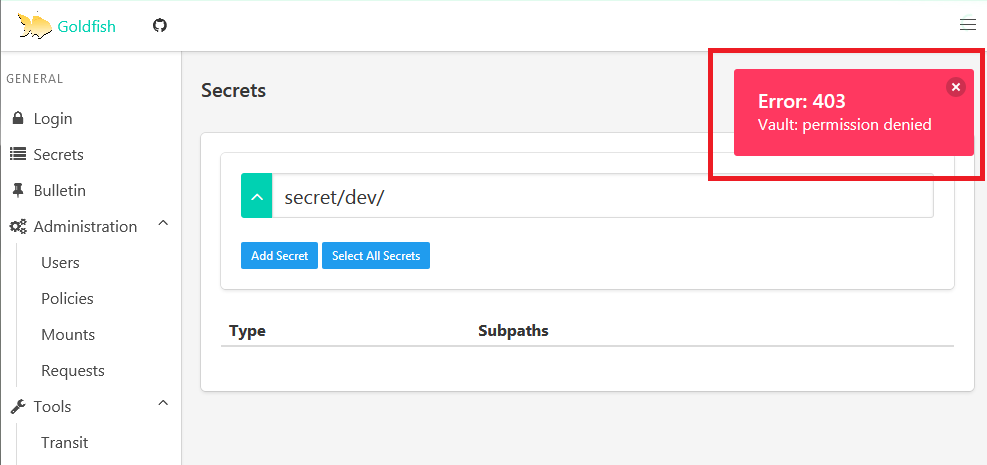
Navigate through dev and try clicking on lead. You’ll get permission denied message. This is becase dev-member1 is not part of dev-lead group.
Navigate to common and you’ll be able to see the credential that is common for dev team.
With this we have verified the ACL for dev-common. Similarly we can repeat the steps to verify other ids.
With this we have addressed the requirement to share common secrets securely
Audit Devices
Audit devices are the components in Vault that keep a detailed log of all requests and response to Vault. Because every operation with Vault is an API request/response, the audit log contains everyinteraction with Vault, including errors.
Multiple audit devices can be enabled and Vault will send the audit logs to both. This allows you to not only have a redundant copy, but also a second copy in case the first is tampered with.
Enable audit device
When a Vault server is first initialized, no auditing is enabled. Audit devices must be enabled by a root user.
When enabling an audit device, options can be passed to it to configure it. For example, the command below enables the file audit device:
$ vault audit enable file file_path=/var/log/vault_audit.log
Important: If you have only one audit device enabled, and it is blocking (network block, etc.), then Vault will be unresponsive. Vault will not complete any requests until the audit device can write.
With this we have addressed all the requirements specified in the scenario. Feel free to provide your feedback/suggestions in the comments section.

