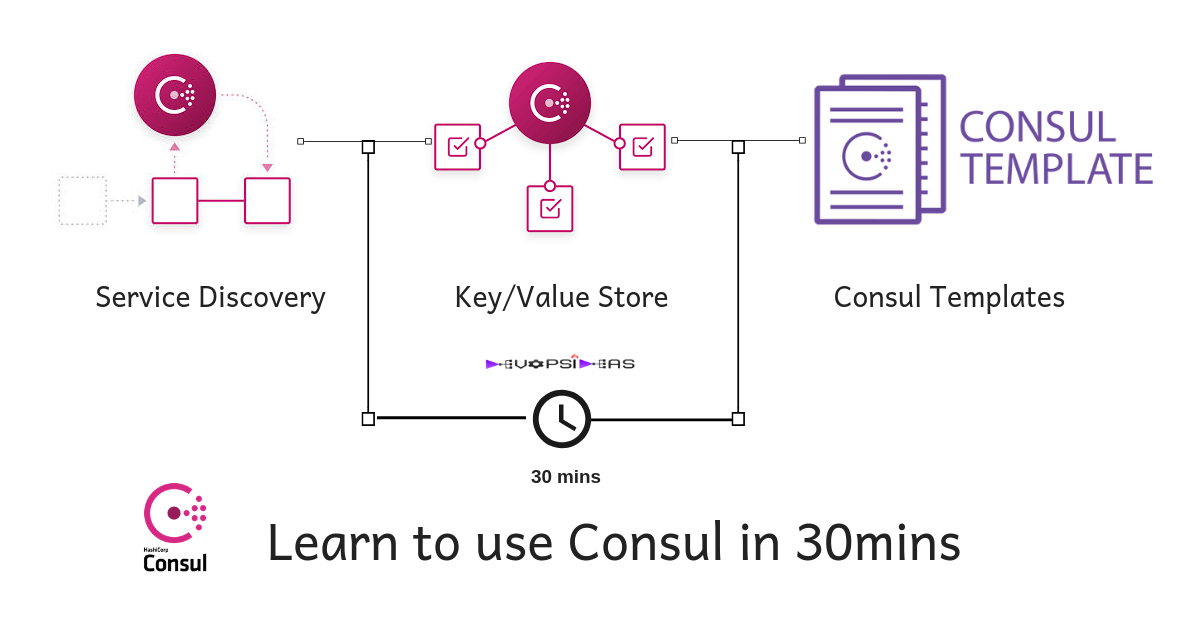
Consul in 30 mins
This will be a quick start guide that will teach you enough to get you start using Consul. To know more about what problems consul solves, read our article about Operational challenges in Microservices and how to overcome it using Consul
Install Consul
Consul installation is very simple. You just need to download the package and extract it. It is a single binary that is executable and that is all you need.
In Linux, the installation of consul is as simple as,
# CONSUL_VERSION=1.4.3

# wget https://releases.hashicorp.com/consul/${CONSUL_VERSION}/consul_${CONSUL_VERSION}_linux_amd64.zip -O /tmp/consul.zip; unzip /tmp/consul.zip -d /usr/local/bin/; rm /tmp/consul.zip
This will download the zip package file, extract it and places it under ‘/usr/local/bin’. The same package is used for both consul master and client
Prerequisites
We will be using docker containers to experiment consul. Make sure you have docker installed if you are planning to try the below steps. You can refer Docker Installation to get steps to install docker across various platform
Consul Setup
Clone learn_consul to your local
The repo contains a Dockerfile that creates an ubuntu image with consul and other command line utilities installed. The docker-compose.yml file will create a local setup containing a consul master and two consul clients.
We are keeping it simple with a single consul master node which should be enough to understand the concepts. But for production, single master architecture is not recommended. Go for either 3 or 5 master nodes in that case.
Run the below command to start the containers, from the directory where you have cloned the files
docker-compose up -d
The above command will create the image (if not present) and starts the containers in detached mode. It forwards port 80 and 8500 of the host machine to the consul master container. We will be using these ports later on.
Make sure the containers are running by executing the below command,
docker ps
You should get the output similar to below,
CONTAINER ID        IMAGE                    COMMAND             CREATED             STATUS              PORTS                                          NAMES
43ab3a338cd1        consul_cmaster   "/bin/bash"         5 hours ago         Up 5 hours          0.0.0.0:8500->8500/tcp, 0.0.0.0:8080->80/tcp   consul-master
ee4fbccedfcb        consul_cagent1   "/bin/bash"         5 hours ago         Up 5 hours                                                         consul-client1
b0a522d765a5        consul_cagent2   "/bin/bash"         5 hours ago         Up 5 hours                                                         consul-client2
Start Consul Server agent
Let’s first start consul master in consul-master container. Log in to consul-master by executing the below command.
docker exec -it consul-master /bin/bash
Consul package has already been unzipped and placed under /usr/local/bin during image creation. Start consul master by issuing the below command.
cd /root

nohup consul agent -server -bootstrap-expect=1 -data-dir /var/lib/consul -config-dir /etc/consul.d -ui -client 0.0.0.0 &
- -server indicates this agent runs in server mode
- -bootstrap-expect indicates how many server agents it should expect. In this case it is 1. If you run 3 server agents, then it should be 3.
- -data-dir indicates the directory where consul writes the data
- -config-dir indicates the directory where consul will look for configuration files
- -ui flag indicates we also want the consul ui exposed. We will see how to use the UI later on.
Also note that we use ‘nohup‘ to run the process in the background. Now that we have started the server agent in consul-master container, lets quickly check the status of consul members
root@consul-master:/# consul members
 Node           Address          Status  Type    Build  Protocol  DC   Segment
 consul-master  172.23.0.4:8301  alive   server  1.4.3  2         dc1
Above output indicates that we have a server agent running. DC indicates the datacenter where it runs. By default it is set as dc1. One of the key features of Consul is its support for multiple datacenters
Start Consul Client agent
Log in to other two containers consul-client1 and consul-client2.
docker exec -it consul-client1 /bin/bash

docker exec -it consul-client2 /bin/bash
For starting client agents, we should negate the -server flag. Run the below command on both the containers
cd /root

nohup consul agent -data-dir /var/lib/consul -config-dir /etc/consul.d &
Join Consul Clients with Server
Once the client agents are started, we need to join the clients with the server. Run the below command in both the client containers
consul join consul-master
Verify if the members are join by running ‘consul members’
# consul members
Node            Address          Status  Type    Build  Protocol  DC   Segment
consul-master   172.23.0.4:8301  alive   server  1.4.3  2         dc1  <all>
consul-client1  172.23.0.3:8301  alive   client  1.4.3  2         dc1  <default>
consul-client2  172.23.0.2:8301  alive   client  1.4.3  2         dc1  <default>
Service Discovery Using Consul
To understand how consul is used for service discovery, we will be doing a small demo using nginx. Consul provides two types of interfaces to query for services. One using DNS and other using HTTP API.
The primary query interfaces for Consul is DNS. The DNS interface allows applications to make use of service discovery without any high-touch integration with Consul
Since we have already joined our clients with consul master server, we can query for the IP’s using consul DNS. By default, Consul will listen on 127.0.0.1:8600 for DNS queries in the consul. domain, without support for further DNS recursion.
Consul provides two types of queries: node lookups and service lookups. A node lookup, a simple query for the address of a named node, looks like this:
<node>.node[.datacenter].<domain>
The datacenter is an optional part of the FQDN: if not provided, it defaults to the datacenter of the agent. If we know foo is running in the same datacenter as our local agent, we can instead use foo.node.consul.
Node lookup
First lets try doing a node lookup for consul-client2. Run the below command in either consul-master or consul-client1 container
root@consul-client1:~# dig @127.0.0.1 -p 8600 consul-client2.node.consul
 ; <<>> DiG 9.11.3-1ubuntu1.5-Ubuntu <<>> @consul-master -p 8600 consul-client2.node.consul
 ; (1 server found)
 ;; global options: +cmd
 ;; Got answer:
 ;; ->>HEADER<<- opcode: QUERY, status: NOERROR, id: 26381
 ;; flags: qr aa rd; QUERY: 1, ANSWER: 1, AUTHORITY: 0, ADDITIONAL: 2
 ;; WARNING: recursion requested but not available
 ;; OPT PSEUDOSECTION:
 ; EDNS: version: 0, flags:; udp: 4096
 ;; QUESTION SECTION:
 ;consul-client2.node.consul.    IN  A
 ;; ANSWER SECTION:
 consul-client2.node.consul. 0    IN  A   172.23.0.2
 ;; ADDITIONAL SECTION:
 consul-client2.node.consul. 0    IN  TXT "consul-network-segment="
 ;; Query time: 13 msec
 ;; SERVER: 172.23.0.4#8600(172.23.0.4)
 ;; WHEN: Thu Mar 21 09:44:55 UTC 2019
 ;; MSG SIZE  rcvd: 107
As you can see, we got the IP of consul-client2 in the Answer Section.
Service lookup
Next we can try querying for service. But for that we need to have a service registered with Consul. We have nginx installed in all the three containers.
Login in to both the client containers and start the nginx service
service nginx start
Next, we need to register this nginx service in consul. Log in to both the client containers and then create a file named webserver.json under /etc/consul.d/ directory with the below content.
# /etc/consul.d/webserver.json
{
   "service": {
     "name": "webserver",
     "tags": ["colour_server"],
     "port": 80
   }
 }
We are registering a service with the name ‘webserver’ and giving it a tag name of colour_server. We also specify the port it listens on, which is 80 in this case.
Reload consul after adding the above file by running,
consul reload
If everything went right, you should see the below message in the log
# tail -2f /root/nohup.out
    2019/03/21 10:47:17 [INFO] agent: Reloading configuration...
    2019/03/21 10:47:17 [INFO] agent: Synced service "webserver"
We have registered our webserver service in consul. Lets see if we can query the service.
The format of a standard service lookup is:
[tag.].service[.datacenter].<domain>
The tag is optional, and, as with node lookups, the datacenter is as well. If no tag is provided, no filtering is done on tag.
Run the below command in any of the server. In this example, I’m executing it from the master.
root@consul-master:~# dig +noall +answer @127.0.0.1 -p 8600 webserver.service.consul
webserver.service.consul. 0	IN	A	172.23.0.3
webserver.service.consul. 0	IN	A	172.23.0.2
From the output we can see that the dns query resulted in producing two results of the servers that is running the service. We have using +noall and +answer to only give us the answer section and reduces the clutter.
We can also get the service record by running,
# dig +noall +answer @127.0.0.1 -p 8600 webserver.service.consul SRV
webserver.service.consul. 0	IN	SRV	1 1 80 consul-client1.node.dc1.consul.
webserver.service.consul. 0	IN	SRV	1 1 80 consul-client2.node.dc1.consul.
The service record provides details on port the service binds to
Service lookup using HTTP API interface
The equivalent way of querying for a service using HTTP API interface is,
# curl http://127.0.0.1:8500/v1/catalog/service/webserver\?pretty
[
    {
        "ID": "166324e2-00fd-d4d7-40f2-1b2c5a460eb9",
        "Node": "consul-client1",
        "Address": "172.23.0.3",
        "Datacenter": "dc1",
        "TaggedAddresses": {
            "lan": "172.23.0.3",
            "wan": "172.23.0.3"
        },
        "NodeMeta": {
            "consul-network-segment": ""
        },
        "ServiceKind": "",
        "ServiceID": "webserver",
        "ServiceName": "webserver",
        "ServiceTags": [
            "colour_server"
        ],
        "ServiceAddress": "",
        "ServiceWeights": {
            "Passing": 1,
            "Warning": 1
        },
        "ServiceMeta": {},
        "ServicePort": 80,
        "ServiceEnableTagOverride": false,
        "ServiceProxyDestination": "",
        "ServiceProxy": {},
        "ServiceConnect": {},
        "CreateIndex": 1836,
        "ModifyIndex": 1836
    },
    {
        "ID": "0610c3e2-8fbb-af3c-12dc-a9228262fba4",
        "Node": "consul-client2",
        "Address": "172.23.0.2",
        "Datacenter": "dc1",
        "TaggedAddresses": {
            "lan": "172.23.0.2",
            "wan": "172.23.0.2"
        },
        "NodeMeta": {
            "consul-network-segment": ""
        },
        "ServiceKind": "",
        "ServiceID": "webserver",
        "ServiceName": "webserver",
        "ServiceTags": [
            "colour_server"
        ],
        "ServiceAddress": "",
        "ServiceWeights": {
            "Passing": 1,
            "Warning": 1
        },
        "ServiceMeta": {},
        "ServicePort": 80,
        "ServiceEnableTagOverride": false,
        "ServiceProxyDestination": "",
        "ServiceProxy": {},
        "ServiceConnect": {},
        "CreateIndex": 1837,
        "ModifyIndex": 1837
    }
]
Service Discovery – Practical Example
Now that we have registered a service and manually verified that it is working, let us explore how to make an application use the service discovery feature offered by Consul
For this example. we will consider consul master as the load balancer, which will load balance requests between the two clients based on service availability.
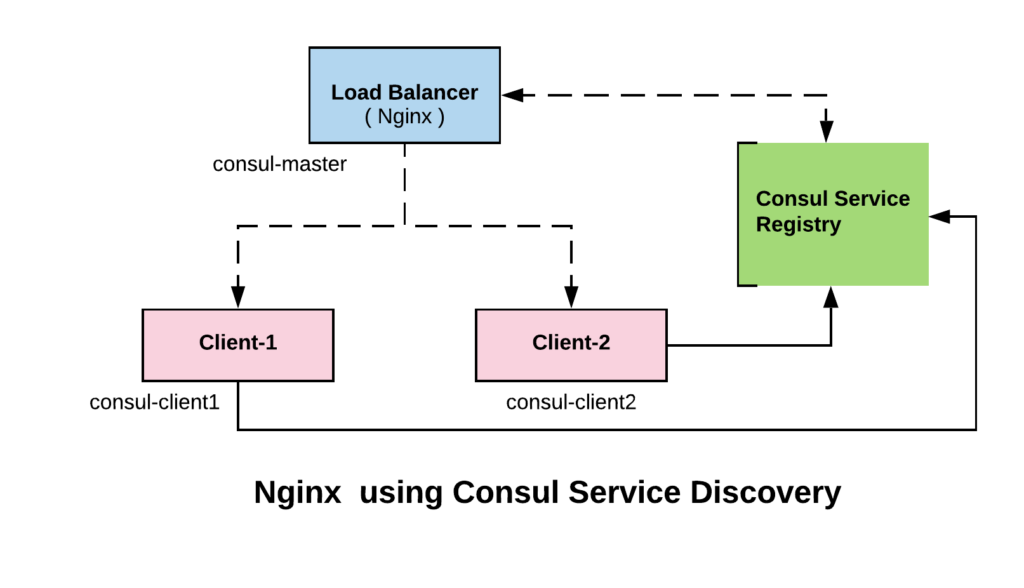
We have nginx installed in all the three containers. Let us create a sample index.html to identify which client is serving the request.
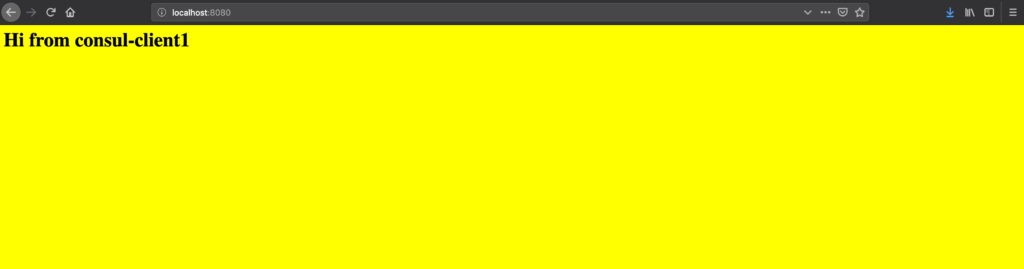
Execute the below command in consul-client1 container
echo "<html> <head> <style> body { background-color: yellow; } </style> </head> <body> <h1> Hi from `hostname` </h1> </body> </html>" > /var/www/html/index.htmlExecute the below in consul-client2 container
echo "<html> <head> <style> body { background-color: pink; } </style> </head> <body> <h1> Hi from `hostname` </h1> </body> </html>" > /var/www/html/index.htmlIn the consul master, update the nginx default conf file with the below content,
Update /etc/nginx/sites-available/default
...

root /var/www/html;

        # Add index.php to the list if you are using PHP
        index index.html index.htm index.nginx-debian.html;

server_name _;

resolver 127.0.0.1:8600 valid=250;
set $consulWebserver http://webserver.service.consul;

        location / {
                # First attempt to serve request as file, then
                # as directory, then fall back to displaying a 404.
                # try_files $uri $uri/ =404;
                proxy_pass $consulWebserver;
        }
...
Update default conf file with values highlighted in blue
We have added the resolver tag to resolve queries using consul DNS. The $consulWebserver variable is set to get the values using service lookup for our webserver service. This value is then passed to proxy_pass.
We can test this in browser by accessing http://localhost:8080

Health Checks
Now lets add an health check to the webserver service we created in the previous step.
Edit /etc/consul.d/webserver.json on both the clients and add the health check as described below
{
  "service": {
    "name": "webserver",
    "tags": ["colour_server"],
    "port": 80,
    "check": {
      "id": "webserver_hc",
      "name": "Health Check for webserver service",
      "http": "http://localhost/index.html",
      "interval": "3s",
      "timeout": "1s"
    }
  }
}
Reload the client agent after making the above changes
consul reloadWe have added a check that tries to fetch the index page of nginx every 3 seconds. If this check fails, the service will be marked as down in consul service registry.
We can test this by stopping nginx in any of the client server
Before stopping nginx service in consul-client1
# dig +noall +answer @127.0.0.1 -p 8600 webserver.service.consul SRV
webserver.service.consul. 0	IN	SRV	1 1 80 consul-client2.node.dc1.consul.
webserver.service.consul. 0	IN	SRV	1 1 80 consul-client1.node.dc1.consul.
After stopping nginx service in consul-client1
root@consul-client1:~# service nginx stop
* Stopping nginx nginx [ OK ]

root@consul-client1:~# dig +noall +answer @127.0.0.1 -p 8600 webserver.service.consul SRV
webserver.service.consul. 0 IN SRV 1 1 80 consul-client2.node.dc1.consul.
After stopping nginx in consul-client1, a query to webserver service shows only one client instance is available out of two.
Restart the nginx instance in consul-client1 after completing the test
Consul Template
The Consul template tool provides a programmatic method for rendering configuration files from a variety of locations, including Consul KV. We will learn about using Consul KV in the next section. The template tool is based on Go templates and shares many of the same attributes. You can learn about using consul template with various example in the consul-template docs
For our example, instead of making changes to /etc/nginx/sites-available/ we can use that as template and render it dynamically when a new service gets added or removed. It’ll be clear what we mean by this, once you go through the next steps.
First lets copy the default conf file from /etc/nginx/sites-available/defaultto /etc/consul-template.d/in consul master container
Run the below command in consul master
cp /etc/nginx/sites-available/default /etc/consul-template.d/nginx-default.conf.ctmplNext update the template file to render the values we need by using consul API. We will be using go templating for this.
The file /etc/consul-template.d/nginx-default.conf.ctmpl should have the below content ( negating all the comments )
upstream consulWebservice {
        {{range service "webserver"}}
        server {{.Address}}:{{.Port}};{{end}}
}
server {
        listen 80 default_server;
        listen [::]:80 default_server;

        root /var/www/html;

        # Add index.php to the list if you are using PHP
        index index.html index.htm index.nginx-debian.html;

        server_name _;

        location / {
                proxy_pass http://consulWebservice;
        }
We have added a new section called consulWebservice that will be used as an upstream server. The config for consulWebservice upstream server will be populated dynamically using consul API.
We use range service to loop through list of all services that are available as part of ‘webserver’ service. We then extract the Address and Port from each item. Later we use this upstream server as proxy_pass endpoint.
To learn more about this templating language, go through these examples
Once we have created the template, next step is to run the consul-template daemon. Both consul and consul-template has been installed as part of our bootstrap process while running docker-compose.
Load the consul-template by running,
consul-template -template "/etc/consul-template.d/nginx-default.conf.ctmpl:/etc/nginx/sites-available/default:service nginx reload" -onceThe first value of the template flag indicates the location of the template file. The second value indicated to which destination file it should be applied to. The third value indicates what should be done after applying the changes. In this case we are reloading the nginx.
Once loading the template. take a look at the content of the original file (/etc/nginx/sites-enabled/default)now. It should look something like below,
upstream consulWebservice {

	server 172.23.0.3:80;
	server 172.23.0.2:80;
}
server {
	listen 80 default_server;
	listen [::]:80 default_server;

	root /var/www/html;

	# Add index.php to the list if you are using PHP
	index index.html index.htm index.nginx-debian.html;

	server_name _;
	resolver 127.0.0.1:8600 valid=250;
	set $consulWebserver http://webserver.service.consul;

	location / {
		proxy_pass http://consulWebservice;
	}
}
Upstream server should now contain the interpolated values based on the result from the API for the upstream.
Ningx will now balance the load evenly between the two servers. We can test that by running the below command in any of the server.
# while true; do curl -s http://consul-master | grep --color=never -o consul-client[1-2]; sleep .25; done

consul-client2
consul-client1
consul-client2
consul-client1
consul-client2
consul-client1
consul-client2
consul-client1
Consul Key/Value Store
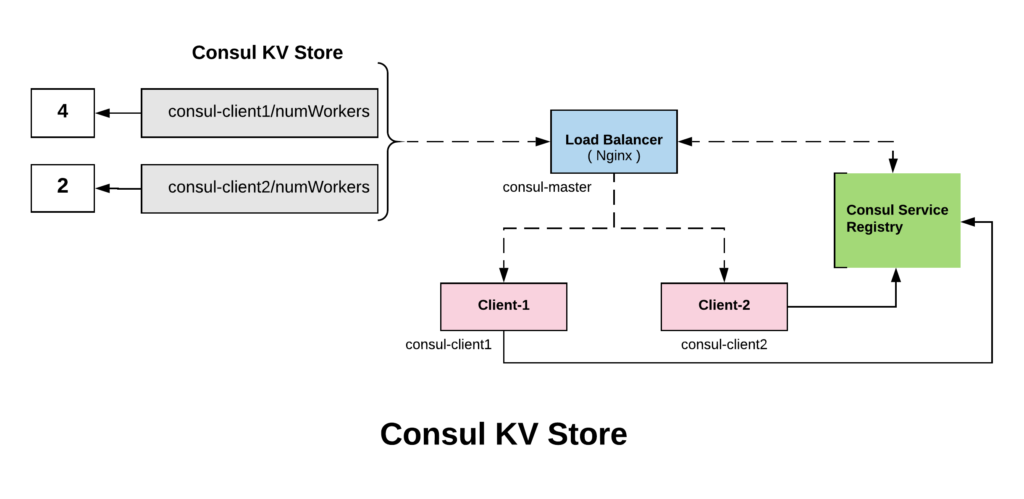
Consul KV store is used for storing service configuration or other metadata. In this we will see how the key value store of consul can co-ordinate and configure parts of our service. We will also see how to use the web-ui of consul.
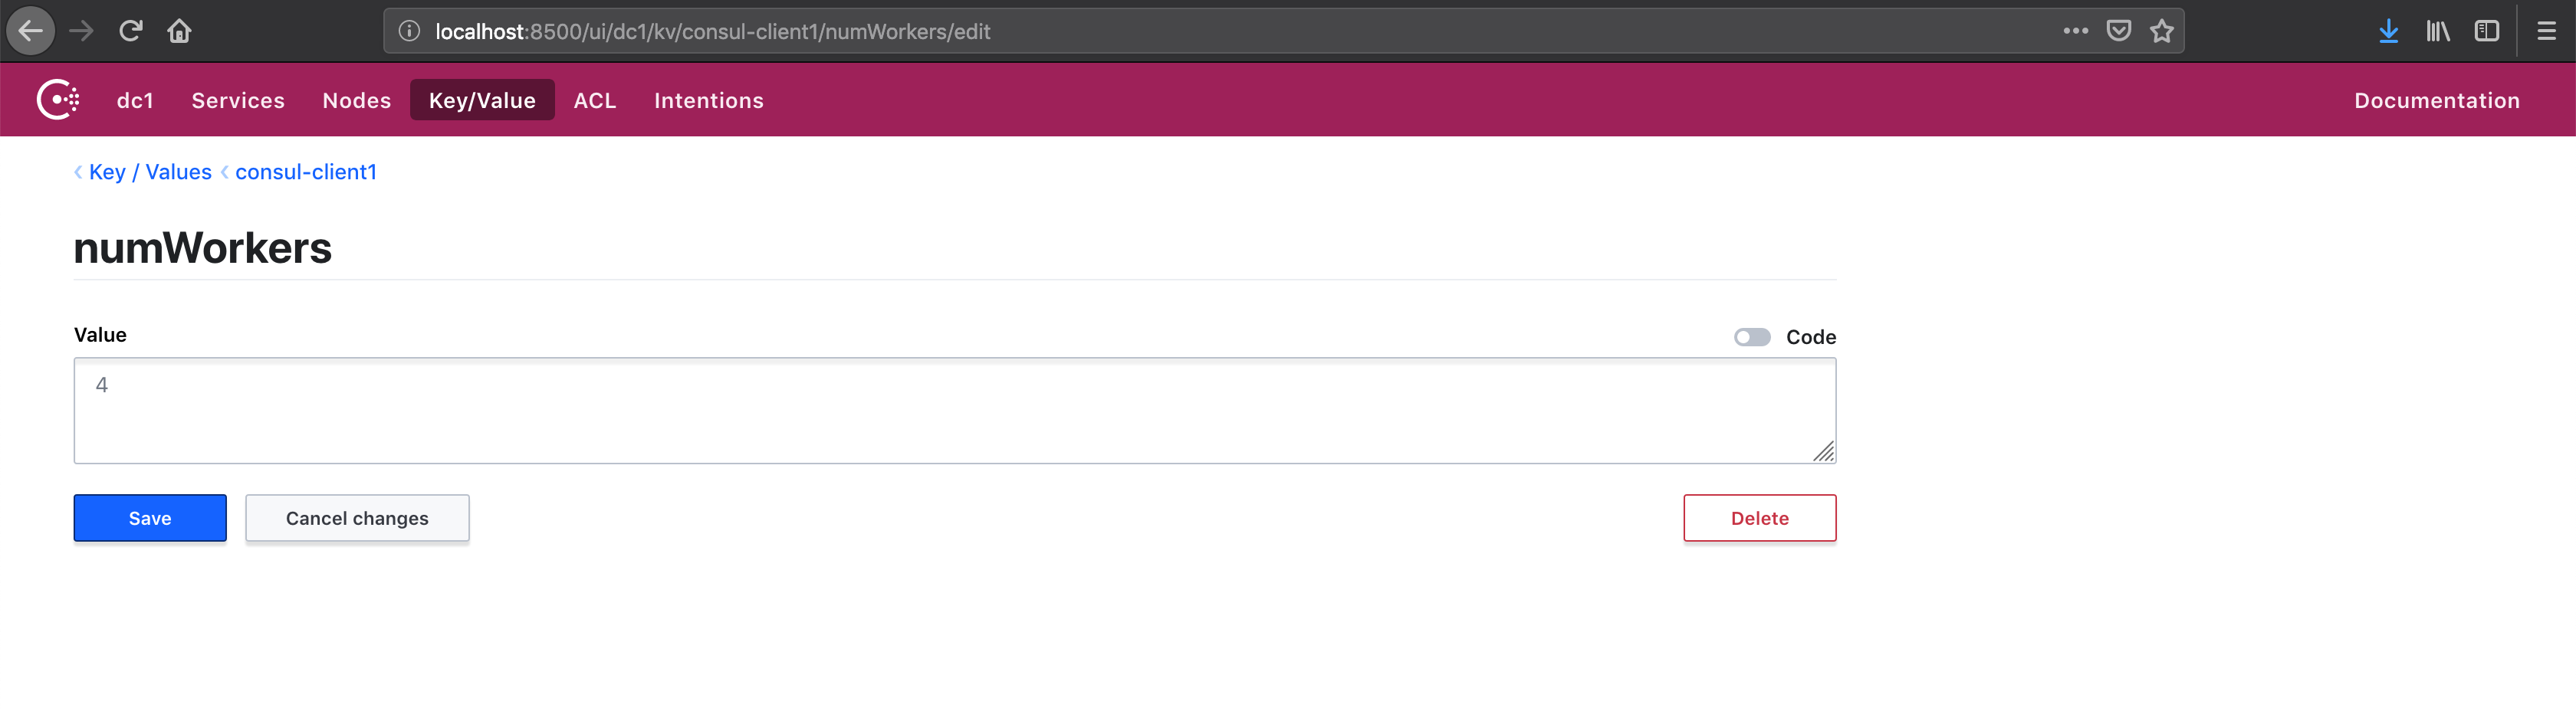
First, let us add a Key called numWorkers for both consul-client1 and consul-client2 with a value of 4 and 2 respectively. We will use it in our nginx default conf file to set weight for each server. The KV store can be accessed by the consul kv CLI subcommands, HTTP API, and Consul UI.
In the below example, we use HTTP API to add the key and value
curl -XPUT http://localhost:8500/v1/kv/consul-client1/numWorkers -d 4

curl -XPUT http://localhost:8500/v1/kv/consul-client2/numWorkers -d 2
We can use the Consul web-ui and verify if the values got added. You can access Consul Web UI by accessing http://localhost:8500/ui in your browser
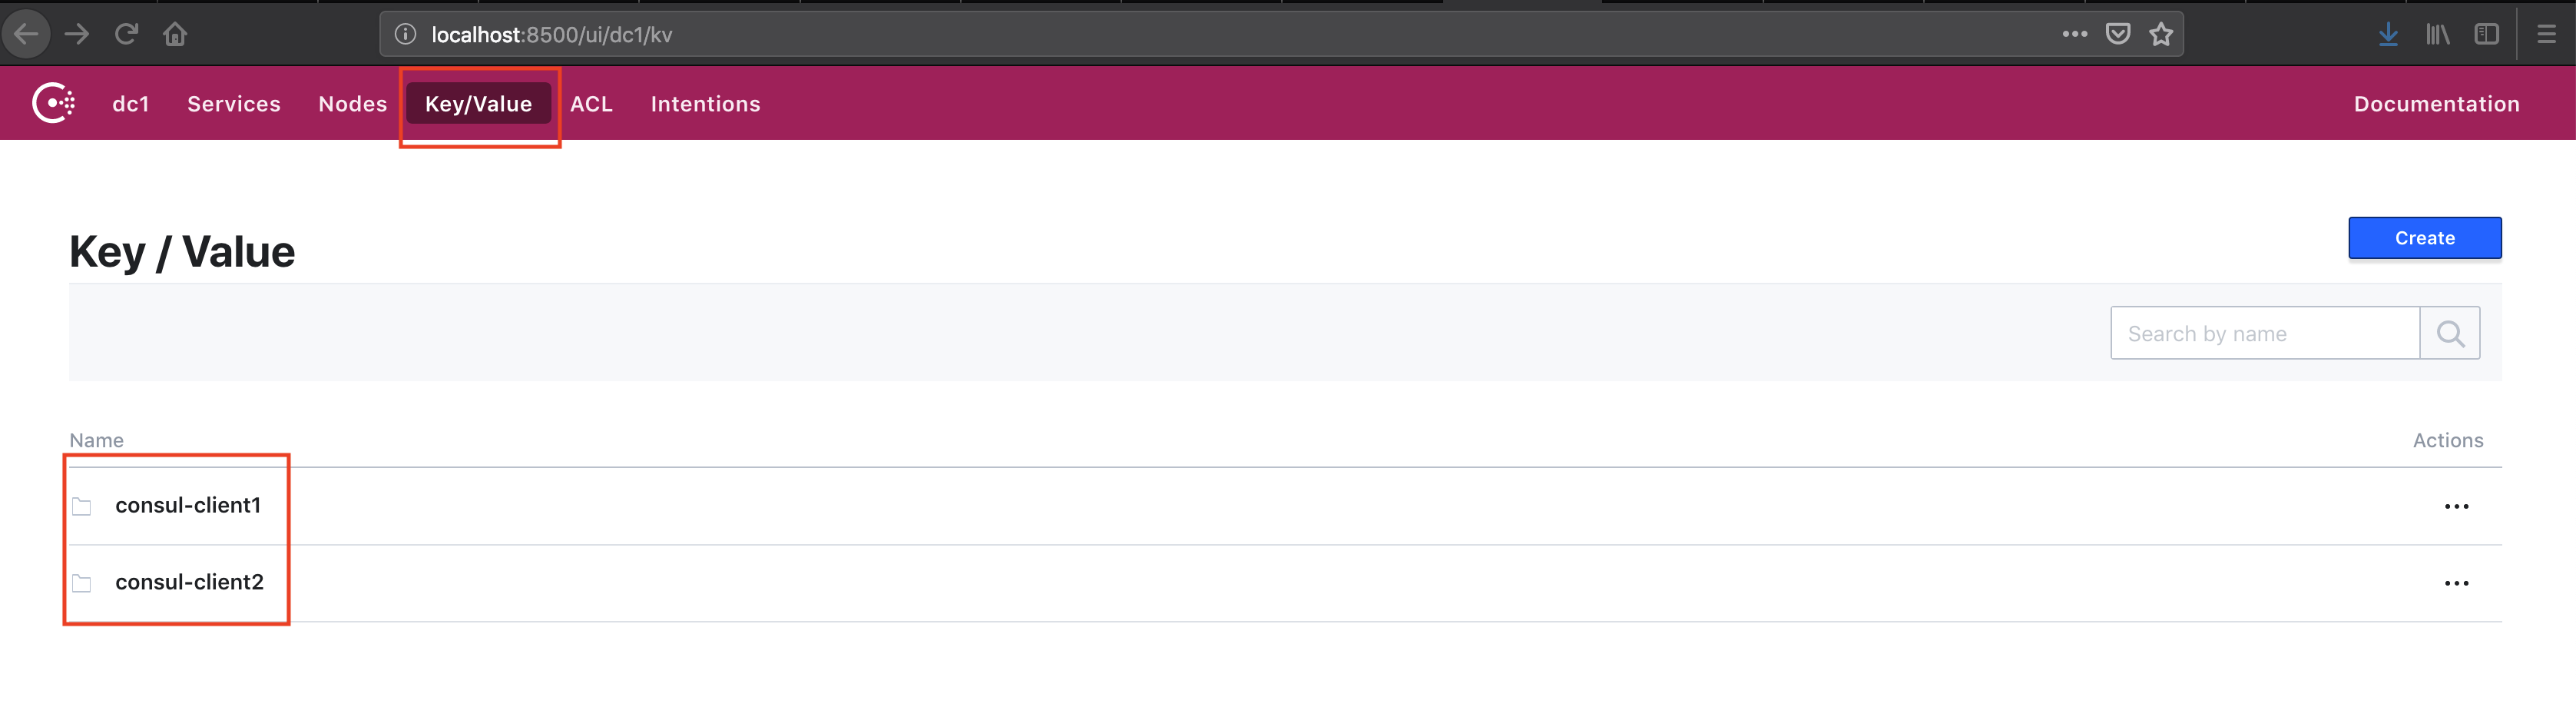
You can try exploring the ui by navigating through various options. We can also use consul kv CLI commands to access KV Store.
# consul kv get consul-client1/numWorkers
4
# consul kv get consul-client2/numWorkers
2
In the next step, we will use the key that we added in our template that we created for nginx default file. In the consul-master server, update the nginx-default.conf.ctmplfile with the below content,
upstream consulWebservice {
	{{range service "webserver"}}
	server {{.Address}}:{{.Port}} weight={{ keyOrDefault (print .Node "/numWorkers") "2"}};{{end}}
}
server {
	listen 80 default_server;
	listen [::]:80 default_server;

	root /var/www/html;

	# Add index.php to the list if you are using PHP
	index index.html index.htm index.nginx-debian.html;

	server_name _;
	resolver 127.0.0.1:8600 valid=250;
	set $consulWebserver http://webserver.service.consul;

	location / {
		proxy_pass http://consulWebservice;
	}
}
As you can see, we have added an additional configuration weigth that gets the value from the KV store. keyOrDefault will check for the presence of a key. If the key is not present it’ll assign default value.
The key we have added is in the format, <node-name>/numWorkers. Hence we are using the print statement to get the node name followed by the corresponding key name.
Once updating the template, we need to reload consul-template
consul-template -template "/etc/consul-template.d/nginx-default.conf.ctmpl:/etc/nginx/sites-available/default:service nginx reload" -onceOnce the template is loaded successfully, we can verify if the correct value got added for the weight argument we added as part of upstream.
cat /etc/nginx/sites-available/default
upstream consulWebservice {

	server 172.23.0.3:80 weight=4;
	server 172.23.0.2:80 weight=2;
}
server {
	listen 80 default_server;
	listen [::]:80 default_server;

	root /var/www/html;

	# Add index.php to the list if you are using PHP
	index index.html index.htm index.nginx-debian.html;

	server_name _;
	resolver 127.0.0.1:8600 valid=250;
	set $consulWebserver http://webserver.service.consul;

	location / {
		proxy_pass http://consulWebservice;
	}
}
We can see the values of weight got populated automatically and it is same as what we set in the KV store. Consul KV store helps us to make changes in the config on the fly. There are numbers of use case with consul KV. For example, you can use a key as a flag to set maintenance for all your webservers or access a specific version of your application, etc.
We can test if the load balancer balances the load based on the wight we have set.
# while true; do curl -s http://consul-master | grep --color=never -o consul-client[1-2];  sleep .25; done
consul-client1
consul-client2
consul-client1
consul-client1
consul-client2
consul-client1
consul-client1
consul-client2
consul-client1
consul-client1
From the output we can see the requests are load balanced with a ratio of 2:1 between consul-client1 and consul-client2
Conclusion
In this startup guide for Consul, we learnt how Service Discovery, HealthChecks, Templates and KV Stores features can be used in Consul. Please post your questions or suggestions in the comment section below.