- How to manage secrets using Hashicorp Vault – HA using DynamoDB
- Addressing secrets compliance using Hashicorp Vault Secrets Engines
Introduction
In this series we will see how to manage secrets using Hashicorp Vault. Before going into the specifics, first lets understand what does a secret mean. In general secrets refer to something that should stay private. Something that is kept or meant to be kept unknown or unseen by others.
If we correlate this with IT, we can call passwords, API Keys, tokens, certificates or anything that we assume to be confidential as secret. In todays distributed systems, we need access to multitudes of secrets: DB credentials, API Keys for accessing cloud and other services, credentials for SOA communication etc. Managing these secrets – Keeping track of who has accessed what, Auditing, Secure Storage, adhering to compliance is a uphill battle. Hashicorp Vault provides all these features out of the box. You can consider it as a swiss army knife in this space.
Scenario
Consider you have to achieve the following things in order to comply with your client’s compliance standards.
– Secrets such as passwords, tokens or API Keys should not be stored in files or hardcoded anywhere. There should be a provision to retrieve the secrets dynamically.
– Secrets should be rotated periodically
– Provision to revoke secrets.
– A secure way to share common secrets among teams and members
– Provision to Audit
Hashicorp Vault
Some of the key features of Vault are – Secure Secret Storage, Dynamic Secrets, Data Encryption, Lease and Renewal, Revocation.
Vault encrypts the secrets prior to writing them to persistent storage, so gaining access to the raw storage isn’t enough to access your secrets. Data is encrypted during transition and data at rest is always encrypted.
It can dynamically generate secrets for systems such as AWS or SQL Databases on-demand. This helps to achieve key/password rotation which is required by various compliance metrics without any additional effort.
All secrets in vault have a lease associated with them. The secrets will be revoked automatically after the lease period. Clients can renew the leases if needed through APIs.
There are multiple authentication backends supported by vault with which we can retrieve secrets. Vault also supports commonly used LDAP backend for authentication which makes it easier to integrate with existing systems.
What we will do?
We will see how we can address the above requirement using Hashicorp Vault. We will build a highly available vault environment using AWS. There will be two vault servers hosted in EC2 instance running in different Availability Zones. They’ll in turn connect to DynamoDB as storage backend. We will use an internal Elastic Load Balancer to route requests to active vault instance by configuring health check.
We will work on the following secret engines that vault provides and learn how to use them with real time scenario.
-
- AWS
-
- Database
-
- Key/Value
We will work on the following authentication mechanism through which we can retrieve the secrets.
-
- Tokens
-
- AppRole
-
- LDAP
Vault HA using DynamoDB – Architecture
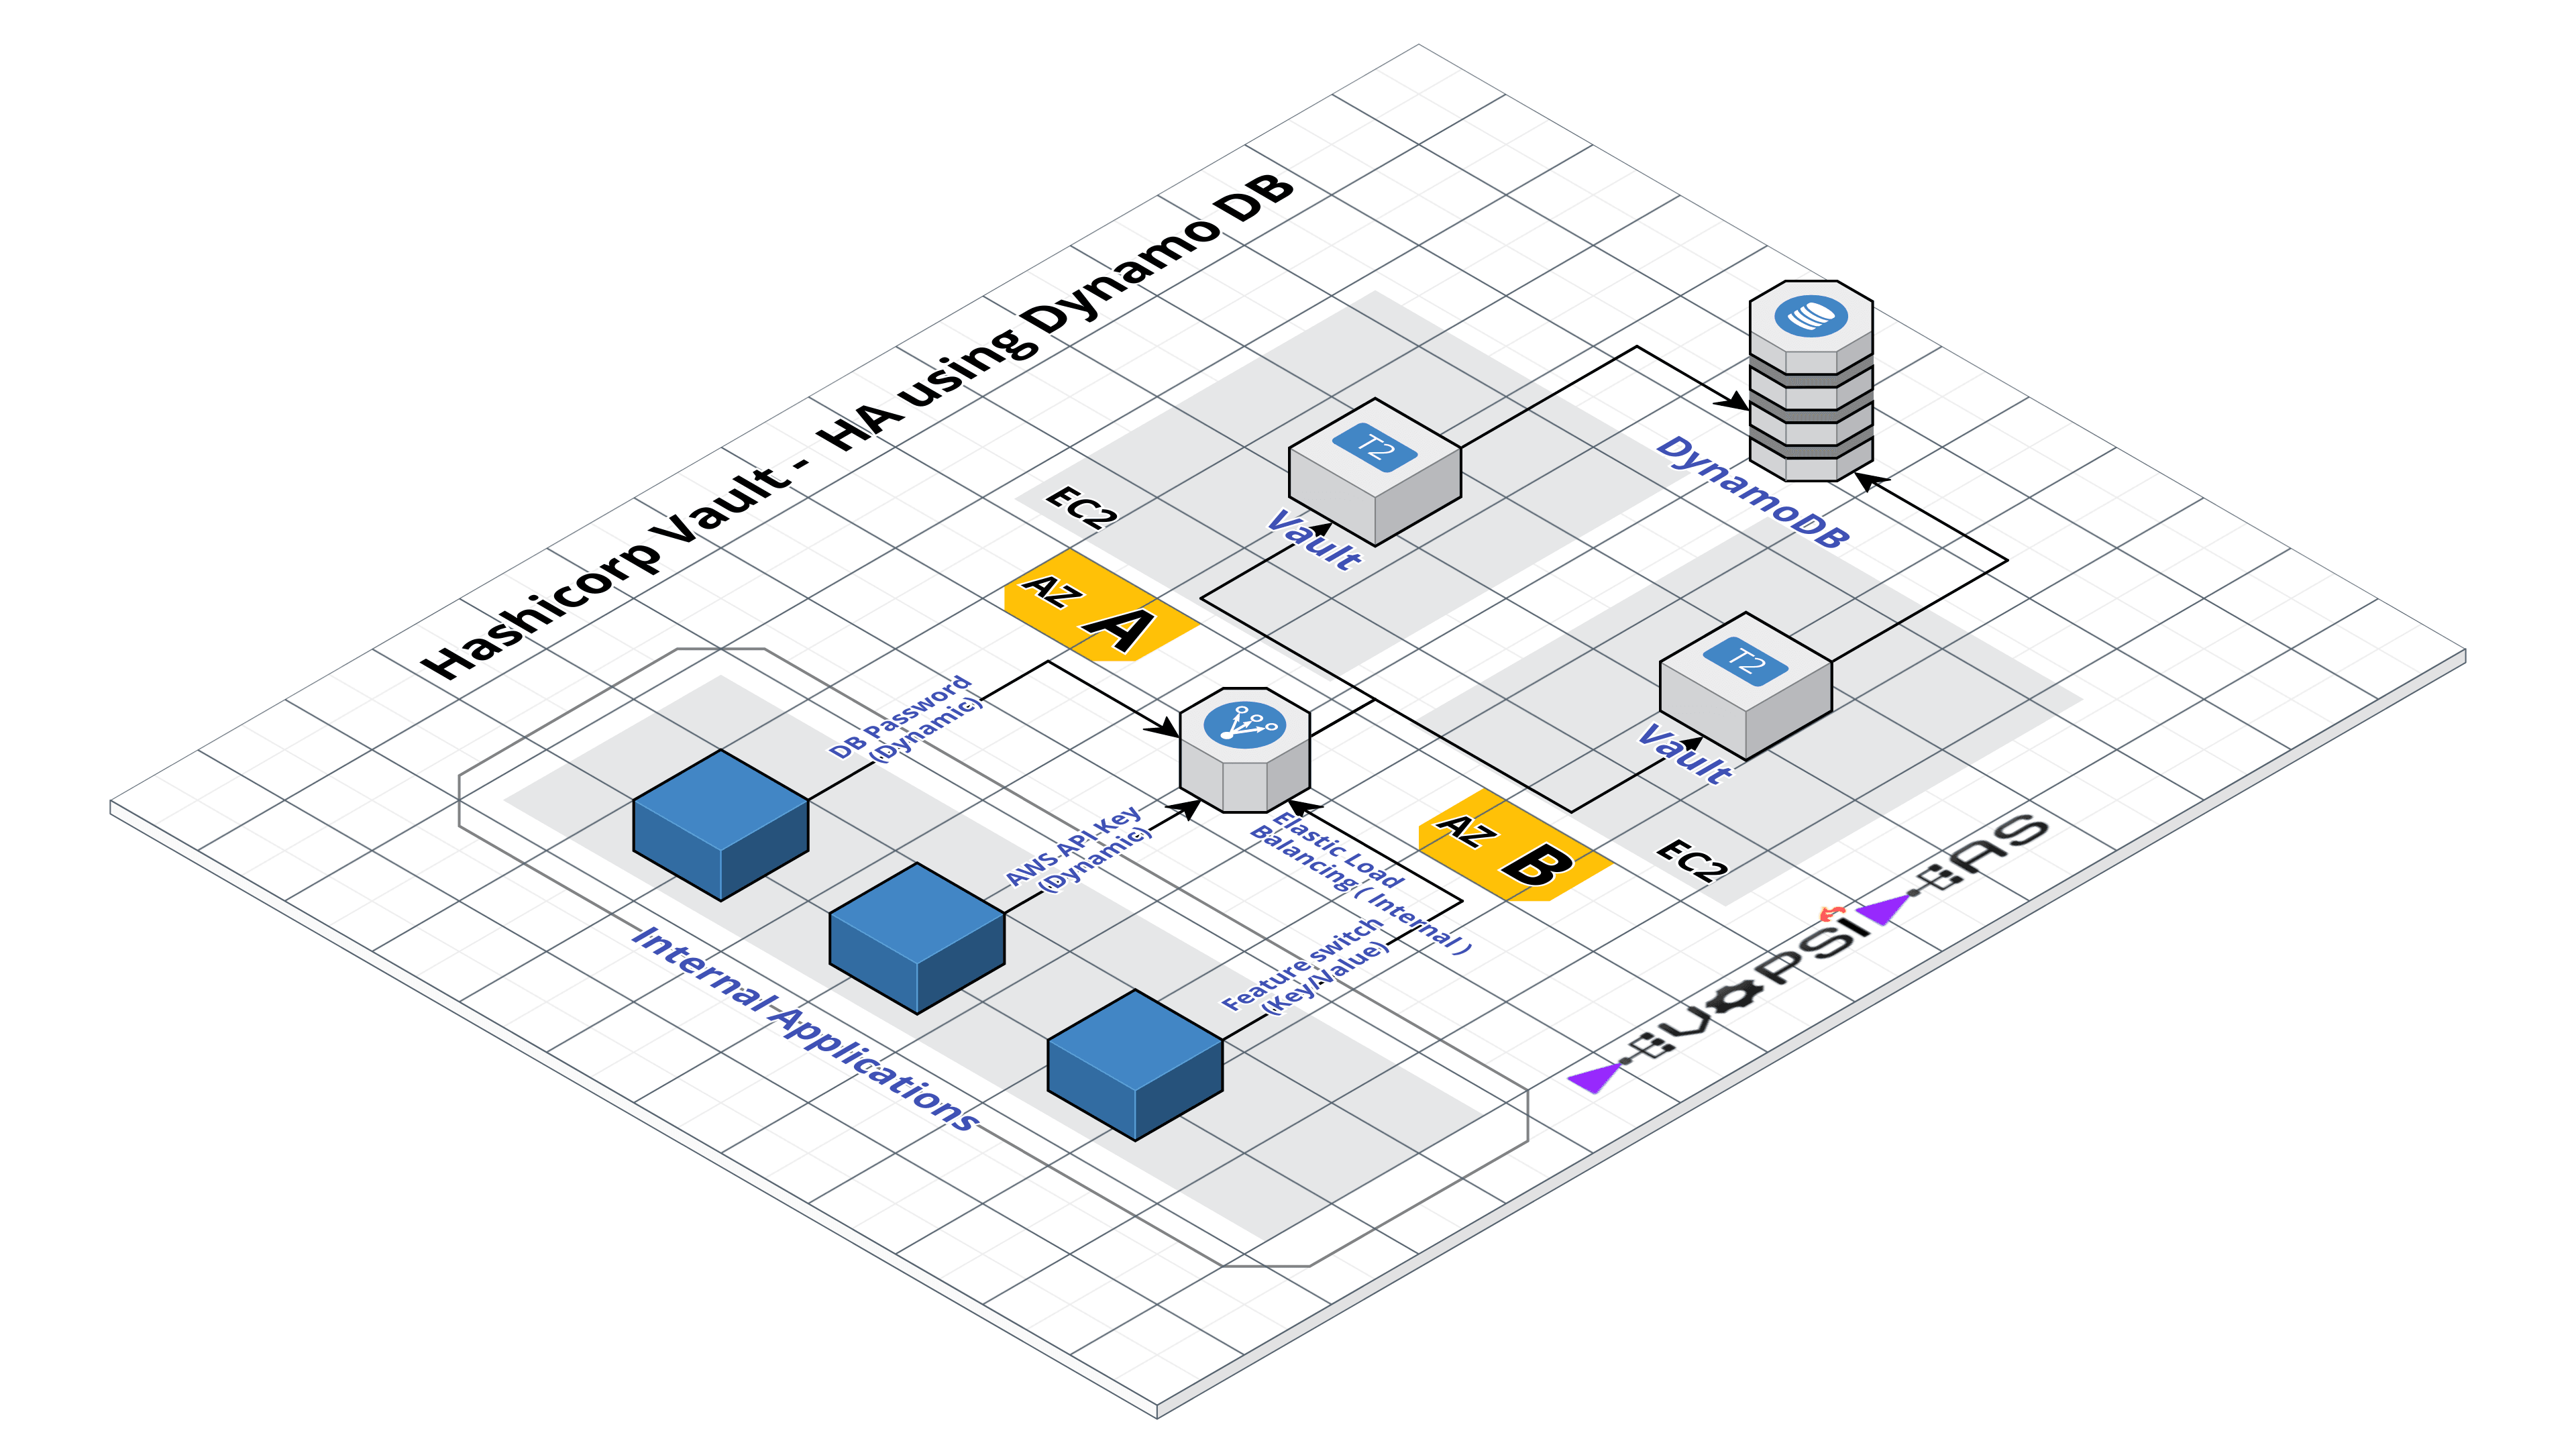
– Two private subnets in two different availability zones
– vault server 1 ( vault-a) runs in availability zone A (AZ A) – Private IP – 10.0.0.190
– vault server 2 ( vault-b) runs in availability zone B ( AZ B) – Private IP – 10.0.1.50
– DynamoDB will be used as backend storage for the vault servers
– Internal Elastic Load Balancer to load balance request to active vault server
Note about vault storage backends and HA
Vault supports many backend storage types for storing data persistently. You can get the list of storage backend that vault supports – here. Not all storage backend supports High Availability. As of writing this article, the below backends support HA
-
- Consul
-
- DynamoDB
-
- Etcd
-
- Spanner
-
- Zookeeper
To be Highly Available, one of the Vault server node grabs a lock within the data store (DynamoDB in this case). The successful server node then becomes the active node; all other nodes become standby nodes. At this point, if the standby nodes receive a request, they will either forward the request or redirect the client depending on the current configuration and state of the cluster. Because of this architecture, HA does not enable increased scalability.
It is also possible to split storage backends for data and HA. For eg, a Vault cluster can be set up to use Consul as the ha_storage to manage the lock and use AWS S3 as the storage for all other persisted data.
Install Vault on both the nodes
We will be using ubuntu 16.04 instance in this article. Installing vault is straight forward. To install the precompiled binary, download the appropriate package for your system. Once downloaded, unzip it and copy the binary to the location which is part of $PATH ( eg: /usr/local/bin ). The vault binary inside is all that is necessary to run Vault.
## vault-a Node ##

$ cd /tmp
$ wget -O vault.zip wget https://releases.hashicorp.com/vault/0.9.5/vault_0.9.5_linux_amd64.zip
$ unzip vault.zip
$ sudo mv vault /usr/local/bin/


## Verify vault is working

$ vault -h
Repeat the same steps in vault-b node
Start Vault sever
We need to create a config file with storage and listener configuration in order to start the vault server. Since we are using Dynamo DB as storage backend, we need to provide options that are available for Dynamo DB.
Create a configuration file – vault-config.hcl under /etc with the below content in vault-a node.
api_addr = "http://<private_ip_of_vault_a_node>:8200"

storage "dynamodb" {
max_parallel = 128
ha_enabled = "true"
region = "<DynamoDB region - eg: us-east-1>"
table = "vault-data"
access_key = "<Access key>"
secret_key = "<Secret Key>"
recovery_mode=1
}

listener "tcp" {
address = "0.0.0.0:8200"
tls_disable = 1
}
Most of the options are self explanatory.
api_addr – Specifies the address to advertise to other Vault servers in the cluster for client redirection.
You need to pass your access_key, secret_key of the IAM user that has required access to DynamoDB. region specifies the DynamoDB region. The most recommended way is to use an EC2 IAM role so that you don’t have to hardcode your API keys.
You can just pass the name of the table where you want the data to be stored and Vault creates it automatically.
recovery_mode=1 indicates that this node will act as the active node. To start with we will make vault-a node as the active node.
tls_disable=1 indicates that we are disabling TLS. We are doing this since we will use ELB in front of the two nodes and that SSL termination will take place at the ELB level.
Start vault server in vault-a node by running the below command.
## vault-a node ##

$ nohup vault server -config=/etc/vault-config.hcl &
Create a configuration file – vault-config.hcl under /etc with the below content in vault-b node.
api_addr = "http://<private_ip_of_vault_b_node>:8200"

storage "dynamodb" {
max_parallel = 128
ha_enabled = "true"
region = "<DynamoDB region - eg: us-east-1>"
table = "vault-data"
access_key = "<Access key>"
secret_key = "<Secret Key>"
}

listener "tcp" {
address = "0.0.0.0:8200"
tls_disable = 1
}
Note we have omitted recovery_mode, for vault-b node since there can be only once active vault node at any given time as discussed earlier.
Start the vault server in node-b
## vault-b node ##

$ nohup vault server -config=/etc/vault-config.hcl &
Manage vault service using supervisor
In the previous step we have started vault in background using nohup. A more proper way will be to manage the service using supervisor. This way, vault process will automatically start during server startup.
Install supervisor,
sudo apt-get install supervisor
Create a config file for vault in supervisor
cat << EOF > /etc/supervisor/conf.d/vault.conf
[program:vault]
command=/usr/local/bin/vault server -config=/etc/vault-config.hcl
user=root
stderr_logfile=/var/log/vault.err.log
stdout_logfile=/var/log/vault.out.log
EOF
If you have already started vault using nohup, kill the process first.
pkill vault
Start vault using supervisor
$ supervisorctl start vault
vault: started
Initialise Vault in vault-a node
Now that vault is up and running, the next step is to initialize vault. By default, vault server starts in sealed state. Initialization is when, you generate unseal keys to unseal vault. This can be done only once. Vault is configured to know where and how to access the physical storage, but doesn’t know how to decrypt any of it. Unsealing is the process of constructing the master key necessary to read the decryption key to decrypt the data, allowing access to the Vault.
Vault uses Shamir’s Secret Sharing algorithm to split the master key into shards. A certain threshold of shards is required to reconstruct the master key.
For this example, let’s initialise vault with 5 key shares with a threshold of 3. In node vault-a, run the below command.
## vault-a Node ##

$ vault init -key-shares=3 -key-threshold=2
You’ll get an output as below,
$ vault init -key-shares=3 -key-threshold=2

WARNING! The "vault init" command is deprecated. Please use "vault operator
init" instead. This command will be removed in Vault 0.11 (or later).

Unseal Key 1: 3Z4hgV0JpNLRCpMkP+0G/+QseKmMyNa/Cy6r0qcftI44
Unseal Key 2: dOrgvxMW5+iwXAcqGzpQ8z/2M+bbnO1Ph/zAe+KZ1lwE
Unseal Key 3: 1cWQjI0sAcG9vtaKEKkIUa4NbvCPbE9Z/vknE47Fmvce
Unseal Key 4: wbw9IlEV/W6gqdE8nvrmz7eVLMbuuCs6PT3neJfmBF2M
Unseal Key 5: em8bNwGa/lNaIV611/t3GOnTldmVehxmi17489kPUDag

Initial Root Token: 06083517-1adc-71e9-7c81-a012c804cb8a

Vault initialized with 5 key shares and a key threshold of 3. Please securely
distribute the key shares printed above. When the Vault is re-sealed,
restarted, or stopped, you must supply at least 3 of these keys to unseal it
before it can start servicing requests.

Vault does not store the generated master key. Without at least 3 key to
reconstruct the master key, Vault will remain permanently sealed!

It is possible to generate new unseal keys, provided you have a quorum of
existing unseal keys shares. See "vault rekey" for more information.
As you can see, the command generated 5 unseal keys and a Root Token. The Root Token is used to authenticate to vault and it has complete access.
Note: In realtime production environment, a single user initialising vault and receiving all the unseal keys and distributing it to owners who will be responsible for unsealing it will defeat the promises of Vault’s security model. You can overcome this by initialising vault using PGP or GPG keys , where the generated unseal keys will immediately be encrypted with the users PGP/GPG keys. Only the owner of the corresponding private key will be able to decrypt the value revealing the plaintext unseal key.
Unseal Vault
vault-a Node
We can unseal vault now using the unseal keys generated in the previous step. We need to set the VAULT_ADDR environment variable in order to communicate with the vault server.
Run the below command to set VAULT_ADDR
echo 'export VAULT_ADDR="http://127.0.0.1:8200"' > /etc/profile.d/vault.sh
Check the status of vault server in vault-a node
## vault-a Node ##

$ vault status

Key Value
--- -----
Seal Type shamir
Sealed true
Total Shares 5
Threshold 3
Unseal Progress 0/3
Unseal Nonce n/a
Version 0.9.5
HA Enabled true
The value of true for Sealed indicates vault in sealed. Lets unseal vault in vault-a node.
## vault-a Node ##

$ vault operator unseal

Unseal Key (will be hidden): <you'll pass unseal key here>
Key Value
--- -----
Seal Type shamir
Sealed true
Total Shares 5
Threshold 3
Unseal Progress 1/3
Unseal Nonce 7406d9e4-69cd-6891-aae5-7b1bcd8ac0e6
Version 0.9.5
HA Enabled true
Unseal Progress indicates how many more unseal keys are needed to construct the master key. In our case, we need two more unseal keys. Repeat the steps until you unseal the vault.
Once unsealed, check the status of vault.
## vault-a Node ##

$ vault status

Key Value
--- -----
Seal Type shamir
Sealed false
Total Shares 5
Threshold 3
Version 0.9.5
Cluster Name vault-cluster-88154426
Cluster ID 9dc06f0d-5e46-dc78-e8ce-c450c89a7e49
HA Enabled true
HA Cluster https://10.0.0.190:8201
HA Mode active
The status of the vault node now shows Sealed as false. HA Mode of active indicates that this is the active vault node. HA Cluster points to the URL of the active node. In this case it points to the same node since it is the active node.
vault-b Node
Set the VAULT_ADDR environment variable in order to communicate with the vault server.
echo 'export VAULT_ADDR="http://127.0.0.1:8200"' > /etc/profile.d/vault.sh
Initialisation is required only once and other cluster members are aware of the unseal keys. Hence we can directly run the unseal command in vault-b node. Repeat the same steps as we did in vault-a node to unseal vault.
Once unsealed, check the status of the vault.
## vault-b Node ##

$ vault status

Key Value
--- -----
Seal Type shamir
Sealed false
Total Shares 5
Threshold 3
Version 0.9.5
Cluster Name vault-cluster-88154426
Cluster ID 9dc06f0d-5e46-dc78-e8ce-c450c89a7e49
HA Enabled true
HA Cluster https://10.0.0.190:8201
HA Mode standby
Active Node Address: http://10.0.0.190:8200
The HA Mode in vault-b shows as standby. This is because only one vault server can be active and since vault-a is already active vault-b is in standby. Active Node Address provides the address of the node which is currently active.
HA Validation
Now that we have everything in place, lets verify if the HA setup is working as expected before configuring ELB. We can run the simulation by shutting down the vault server normally and by running kill -9 to simulate abnormal shutdown.
We already configured vault-a to be the active node and hence vault-b is in standby.
Normal shutdown:
Assumption:
vault-a: active
vault-b: standby
Let us stop the vault server in vault-a node and check if vault server in vault-b becomes active.
## vault-a Node ##

$ supervisorctl stop vault
vault: stopped
Now that vault server in vault-a is stopped, vault-b node should become active for HA to work as expected.
## vault-b Node ##

$ vault status

Key Value
--- -----
Seal Type shamir
Sealed false
Total Shares 5
Threshold 3
Version 0.9.5
Cluster Name vault-cluster-88154426
Cluster ID 9dc06f0d-5e46-dc78-e8ce-c450c89a7e49
HA Enabled true
HA Cluster https://10.0.1.50:8201
HA Mode active
We can see that vault-b has become the active node and HA Cluster points to 10.0.1.50 which is the private IP of vault-b node. HA is working as expected.
Abnormal shutdown:
We can simulate an abnormal shutdown of vault server by running kill -9 <pid of vault>. If you have performed the above step, make sure you have started the vault server in vault-a node again and unsealed it.
Assumption:
vault-a: standby
vault-b: active
Hard kill the vault server in vault-b node.
## vault-b Node ##

pkill -9 vault
Note: Supervisor will restart the vault service after the kill operation but it’ll remain in unsealed state.
Check the status of vault server in vault-a node.
## vault-b Node ##

$ vault status

Key Value
--- -----
Seal Type shamir
Sealed false
Total Shares 5
Threshold 3
Version 0.9.5
Cluster Name vault-cluster-88154426
Cluster ID 9dc06f0d-5e46-dc78-e8ce-c450c89a7e49
HA Enabled true
HA Cluster https://10.0.0.190:8201
HA Mode active
Node vault-a has become active now. HA Cluster now points to 10.0.0.190 which is the private IP of vault-a.
This confirms that our HA configuration is working as expected.
Configure Internal Elastic Load Balancer
Now that our HA setup is working as expected, we can configure Internal ELB to load balance request to active vault node. There are few important configurations that should be made as part of ELB configuration.
It should be a Classic Load Balancer. In the Basic Configuration, make sure you select Internal Load Balancer and set the port number of Load Balancer to 80 and Instance Port to 8200.

Use the below parameter for health check. The context /v1/sys/health will return 200 if it is an active vault node. You can tweak the Response Timeout, Interval etc as per your need.

Add the EC2 instances that should be member of this LB.

Important: Make sure you have provided access for Internal ELB for port 8200 in the Security Group attached to EC2 Instance.
If everything is configured correctly, you’ll see only one of the vault instance in InService state.

We have completed the setup needed to run vault in HA. In the next article, we will discuss how to address the requirements described as part of the scenario earlier.

