Scenario:
Consider you have been assigned a task to improve the response time of an application. Assume that, it is a php application running in a server with apache serving requests to the end user. You have identified that there is a lot of static content being served by apache. You needed a solution where the processing of static content should be off loaded from apache to make better use of its power for serving dynamic content. You also need a caching solution to further increase the response time. You need to implement these solutions without the overhead of introducing new technologies that need to be learned and maintained.
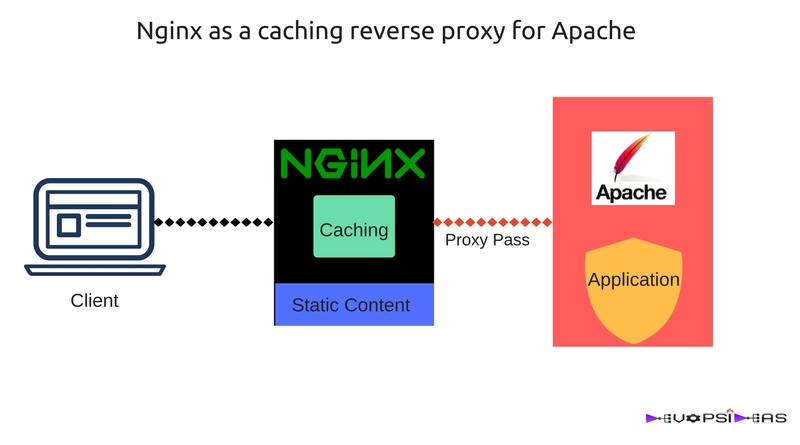
Nginx as a caching reverse proxy for apache:
Apache and nginx are the two most widely used webservers . Apache reigns as the number one web server for websites and nginx takes the second place. Apache is very good in processing dynamic content with its powerful engine whereas Nginx is very much faster compared to apache in serving static content. Further Nginx can act as a caching server when placed in front of web/application servers. By enabling caching, requests for static or dynamic assets that are cached, need not even reach the application (or static content) servers – our cache server can handle many requests all by itself!
This is exactly what our requirement is as per our scenario. We can get a better solution to our scenario by combining both these aspects of Apache and Nginx. Let us see how we can achieve this.
What we are going to do?
We will perform the below steps to implement the above said things.
- Install Nginx which will serve as the front end of our site
- Install Apache which act as the origin server for Nginx
- Configure Nginx to act as reverse proxy for apache
- Configure Apache
- Enable Nginx caching and customize cache settings
- Enable necessary apache modules
- Install php and validate the setup
Consideration:
- We will be using Ubuntu 14.04 instance for this example. Modify the installation steps as per the distribution which you are running on.
- We will be running both Nginx and Apache in the same server
- Is is assumed that all the commands are executed as root user
Install Nginx
We can install nginx using apt-get package manager.
$ apt-get install nginx
If your package manager version of nginx is old and you want the latest one, then you can follow the below step to get the latest version.
$ echo "deb http://nginx.org/packages/ubuntu/ `lsb_release -cs` nginx" >> /etc/apt/sources.list.d/nginx.list

$ echo "deb-src http://nginx.org/packages/ubuntu/ `lsb_release -cs` nginx" >> /etc/apt/sources.list.d/nginx.list

$ apt-get update

$ apt-get install nginx
Note: You might receive a GPG error while running ‘apt-get update’ after updating the repository url for nginx as below.
W: GPG error: http://nginx.org trusty Release: The following signatures couldn't be verified because the public key is not available: NO_PUBKEY ABF5BD827BD9BF62
Run the below command to fix this error.
$ apt-key adv --keyserver keyserver.ubuntu.com --recv-keys $key
Where $key is the value of NO_PUBKEY. In our case it is ABF5BD827BD9BF62
Check the version of nginx by running the below command
# nginx -v
nginx version: nginx/1.10.2
Check the status of nginx by running the below command
 $ service nginx status
   * nginx is running
Install Apache
We can install apache using apt-get package manager.
But before that, we already have nginx running in port 80. When we try to install apache in the same machine, by default it’ll try to start itself in port 80 since it is the default http port for both nginx and apache.
We will get an error stating ‘The port is already in use’. In order to overcome this, we can prevent apache from starting after its installation using the below method.
Create a file with the name policy-rc.d under “/usr/sbin/policy-rc.d”
touch /usr/sbin/policy-rc.d
The file should have the below content
#!/bin/sh
exit 101
Now install apache by running the below command
$ apt-get install apache2
Now that we have got apache installed, we can remove the ‘policy-rc.d’ file which we created.
$ rm -rf /usr/sbin/policy-rc.d
Verify the version of apache server by running the below command.
 $ apache2 -v
Server version: Apache/2.4.7 (Ubuntu)
Configure Nginx to act as reverse proxy for apache
Create a new configuration file under “/etc/nginx/conf.d”. Disable the default configuration file that comes with installation by removing it.
$ touch /etc/nginx/conf.d/mysite.conf

$ cd /etc/nginx/conf.d/

$ rm default.conf
For this example, we name the configuration file as mysite.conf . You can name it as per your need and requirement.
The below configuration considers that both apache and Nginx are running in the same host. The content of mysite.conf should be as below.
server {
        listen   80;

        root /var/www/mysite;
        index index.php index.html index.htm;

        server_name mysite.com;

        proxy_set_header X-Real-IP  $remote_addr;
        proxy_set_header X-Forwarded-For $remote_addr;
        proxy_set_header X-Forwarded-For $proxy_add_x_forwarded_for;
        proxy_set_header Host $host;


        location ~ \.php$ {

                proxy_pass http://127.0.0.1:8080;
        }

        location / {

                try_files $uri $uri/  @backend;
        }


        location @backend {
                # essentially the same as passing php requests back to apache
                proxy_pass http://127.0.0.1:8080;
        }


        location ~ /\.ht {
                deny  all;
        }


}
The following changes were implemented in the configuration:
- We have set the port that nginx should listen on using the listen directive.
- The root was set to the correct web directory. This corresponds to Document root in apache
- The index line specifies the default index file that should be served. In this case it first checks for index.php
- The server_name specifies the FQDN or ip address for which this configuration will be applied on. Pass your respective domain name here.
- Using the proxy_set_header, we are forwarding the client ip address to apache.
- The first location directive ( location ~ \.php$ ) will check for php files. The proxy_pass attribute lets you define the address of the proxied server. In our case since we have apache server running in the same host, we have provided the address as http://127.0.0.1:8080 assuming that we will run apache in port 8080.
- In the second location directive ( location / ) try_files attempts to serve whatever page the visitor requests. If nginx is unable to serve it, then the file is passed to the backend context ( location @backend ), where the proxy details are provided.
- The ( location ~ /\.ht ) will refuse all requests for files beginning with the characters .ht . This directive is useful if your Apache deployment relies on settings from .htaccess and .htpasswd
There are few important things that you need to note here. The order of the location directive is important here. If we had kept the ( location / ) directive in the first place before ( location ~ \.php$ ), then if your index page is a php page (index.php) then the file gets downloaded instead of being rendered when you access it. This is because, we have not installed php-fpm which nginx requires in order to process php files. We have not installed it since we want our php files to be processed by apache.
Make sure that the Document root for apache and nginx are same. This will ensure that nginx can deliver static files directly without passing the request to Apache. Static files (like JavaScript, CSS, images, PDF files, static HTML files, etc.) can be delivered much faster with nginx than Apache.
At times specifying the proxy_pass address to loopback address (127.0.0.1) might break some functionalities in your application. In that case consider using the public ip for proxy_pass
SSL Configuration for Nginx
In case your have enabled SSL, then mysite.conf should be configured as below.
server {
        listen 80;
        server_name mysite.com;
        return 301 https://$server_name:443$request_uri;
  }


server {
        listen 443 ssl;

        server_name mysite.com;

        root /var/www/mysite;
        index index.php index.html index.htm;

        # SSL configuration
        ssl_protocols TLSv1 TLSv1.1 TLSv1.2;
        ssl_ciphers 'EECDH+AESGCM:EDH+AESGCM:AES256+EECDH:AES256+EDH';
        ssl_prefer_server_ciphers on;
        ssl_session_cache shared:SSL:128m;
        ssl_session_timeout 10m;
        ssl_dhparam /etc/nginx/ssl/dhparam.pem;
        ssl_certificate /etc/nginx/ssl/chained-cert.crt;
        ssl_certificate_key /etc/nginx/ssl/private.key;

        # Proxy headers
        proxy_set_header X-Real-IP  $remote_addr;
        proxy_set_header X-Forwarded-For $remote_addr;
        proxy_set_header X-Forwarded-For $proxy_add_x_forwarded_for;
        proxy_set_header Host $host;


        location ~ \.php$ {

                proxy_pass http://backend_hosts;;
        }

        location / {

                try_files $uri $uri/  @backend;
        }

}
The following changes were implemented in the configuration:
- The first server module redirects all http requests to https using the return statement.
- We have further enabled nginx to use SSL by configuring the required SSL settings.
Configure Apache
We need to configure apache to take over the backend, which as we told nginx, will be running on port 8080. Make changes in the ports.conf file to make apache listen in the required port.
$ vi /etc/apache2/ports.conf
Edit the value of ‘Listen’ which instructs the port in which apache should run on. The content of ports.conf should look something like below.
Listen 8080

<IfModule ssl_module>
Listen 8443
</IfModule>

<IfModule mod_gnutls.c>
Listen 8443
</IfModule>
Next, create a new virtual host file, copying the layout from the default apache file:
$ cp /etc/apache2/sites-available/000-default.conf /etc/apache2/sites-available/mysite.conf
Ideally, the content of the apache virtual host file mysite.conf should be as below.
<VirtualHost *:8080>

ServerAdmin [email protected]
DocumentRoot /var/www/mysite


ErrorLog ${APACHE_LOG_DIR}/error.log
CustomLog ${APACHE_LOG_DIR}/access.log combined

</VirtualHost>
The following changes were implemented in the apache mysite.conf file:
- We have changed the value of Virtual host port from 80 to 8080.
- We have made sure that the document root of apache is same as that of nginx.
Next, disable the default site and enable ‘mysite’ which we have just configured.
$ a2dissite 000-default.conf

$ a2ensite mysite.conf
Restart apache server
$ service apache2 restart
Enable Caching in Nginx
Only two directives are needed to enable basic caching in Nginx: proxy_cache_path and proxy_cache. The proxy_cache_path directive sets the path and configuration of the cache, and the proxy_cache directive activates it.
Edit the nginx.conf file in which we will configure the cache settings
vi /etc/nginx/nginx.conf
The content of the nginx.conf file should be something like below.
user  nginx;
worker_processes  1;

error_log  /var/log/nginx/error.log warn;
pid        /var/run/nginx.pid;


events {
    worker_connections  1024;
}


http {
    include       /etc/nginx/mime.types;
    default_type  application/octet-stream;

    log_format  main  '$remote_addr - $remote_user [$time_local] -
                       req_time=$request_time "$request" '
                      '$status $body_bytes_sent "$http_referer" '
                      '"$http_user_agent" "$http_x_forwarded_for"';

    access_log  /var/log/nginx/access.log  main;

    # Log format for caching
    log_format cache '***$time_local '
                   'req_time=$request_time '
                   '$upstream_cache_status '
                   'Cache-Control: $upstream_http_cache_control '
                   'Expires: $upstream_http_expires '
                   '"$request" ($status) '
                   '"$http_user_agent" ';

    # Additional logging for caching
    access_log /var/log/nginx/cache.log cache;

    sendfile        on;
    tcp_nopush     on;

    server_tokens off;
    keepalive_timeout  65;

         # Enable gzip for response compression
         gzip  on;
         gzip_disable "msie6";
         gzip_vary on;
         gzip_proxied any;
         gzip_comp_level 6;
         gzip_buffers 16 8k;
         gzip_http_version 1.1;
         gzip_types text/plain text/css application/json application/x-javascript text/xml application/xml application/xml+rss text/javascript;


        include /etc/nginx/conf.d/*.conf;

        # Enable caching
        proxy_cache_path /var/cache/nginx levels=1:2 keys_zone=edge-cache:10m inactive=20m max_size=1g;
        proxy_temp_path /var/cache/nginx/tmp;

        # Further cache customization
        proxy_buffering on;
        proxy_cache_lock on;
        proxy_cache_use_stale updating;
        proxy_bind 0.0.0.0;
        proxy_cache_valid 5m;


        # Allow underscores in header
        underscores_in_headers on;

        # Set Max Client Body size to 10 MB
        client_max_body_size 10M;

}
The above settings are optimal for server having 1 CPU and 2GB RAM. If the number of CPU’s are higher, then the worker_process value can be altered accordingly.
There are few additional configurations apart from enabling caching from the default configuration. Those are highlighted in the snippet in blue colour.
Explaining all the configuration settings is beyond the scope of this article. Further reading from reader is appreciated in order to understand it and further customize it to adopt to your environment.
Let us breeze through some of the important setting’s that we should make a note of.
- The $request_time parameter in log_format gives us the time taken for the request to be served to the client. It is given in milliseconds. This would be handy when monitoring performance.
- We have additionally setup caching log apart from the regular nginx access log. $upstream_cache_status parameter in the log_format of caching log will show whether the request was a “MISS”, “BYPASS”, “EXPIRED”, “STALE”, “UPDATING”, “REVALIDATED”, or “HIT”.
- We have disabled security tokens ( security_tokens off; ) for security reasons.
- Gzip compression is enabled to enhance performance by compressing the response.
- Caching is enabled using proxy_cache_path and proxy_cache directives. We have named our cache as ‘edge-cache‘ . For further reading on caching parameters, refer this
- underscores_in_headers directive will enable us to use underscores in our headers. If your application uses headers that contain underscores, then you should enable this.
- Using client_max_body_size directive you can set the size of the content that clients can send to the server. If your application accepts large files from end user, then you need to tweak this directive to better suit your needs.
Now that we have enabled caching, we should make changes in nginx’s mysite.conf file to make use of caching. Edit the ‘/etc/nginx/conf.d/mysite.conf’ file again and add the contents highlighted in blue below.
# /etc/nginx/conf.d/mysite.conf

server {

        listen   80;

        root /var/www/mysite;
        index index.php index.html index.htm;

        server_name mysite.com;

        proxy_set_header X-Real-IP  $remote_addr;
        proxy_set_header X-Forwarded-For $remote_addr;
        proxy_set_header X-Forwarded-For $proxy_add_x_forwarded_for;
        proxy_set_header Host $host;


        # Proxy Directives to make use of caching
        proxy_cache edge-cache;
        add_header X-Cache-Status $upstream_cache_status;
        add_header X-Handled-By $proxy_host;
        proxy_pass_request_headers on;
        proxy_cache_revalidate on;
        proxy_read_timeout 180s;

        # Use the below directives in order to allow basic authentication. Without this, nginx will not forward the basic authentication headers to apache.
        proxy_no_cache $cookie_nocache $arg_nocache$arg_comment;
        proxy_no_cache $http_pragma $http_authorization;
        proxy_cache_bypass $cookie_nocache $arg_nocache $arg_comment;
        proxy_cache_bypass $http_pragma $http_authorization;


        location ~ \.php$ {

                proxy_pass http://127.0.0.1:8080;
        }

        location / {

                try_files $uri $uri/  @backend;
        }


        location @backend {
                # essentially the same as passing php requests back to apache
                proxy_pass http://127.0.0.1:8080;
        }


        location ~ /\.ht {
                deny  all;
        }


}
If your application makes use of basic authentication headers, then you need to make sure that it gets passed to apache. Refer the comments in the above snippet on how to accomplish this.
Enable necessary apache modules
We want the client ip’s to be reflected in apache logs as well. We would need to enable apache ‘remoteip‘ module for this. Without this, we will get the ip address that we use in proxy_pass in apache logs.
Run the below command to enable remoteip module
$ a2enmod remoteip
Manually create remoteip.conf file /etc/apache/conf-available .
$ touch /etc/apache2/conf-available/remoteip.conf
Content of remoteip.conf should be as below.
RemoteIPHeader X-Forwarded-For
RemoteIPTrustedProxy 127.0.0.1
If your are using a different ip in the proxy_pass directive, then you need to pass that IP in RemoteIPTrustedProxy.
Install php and validate the setup
Run the below command to install php
$ apt-get install php5
Validation
Alright !! We have everything in place. Lets test the setup now by creating some sample php and html files.
Run the below command to create a sample php and html file under document root.
$ echo "<?php phpinfo(); ?>" > /var/www/mysite/index.php
$ echo -e "<html> <body> <h1>Nginx Caching Reverse Proxy </h1> <p>nginx caching reverse proxy</p> </body> </html>" > /var/www/mysite/test.html
Let us test our setup by using curl command. Let us try accessing index.php file first.
$ curl -X GET -I 127.0.0.1/index.php
HTTP/1.1 200 OK
Server: nginx
Date: Sun, 23 Oct 2016 20:53:07 GMT
Content-Type: text/html
Transfer-Encoding: chunked
Connection: keep-alive
Vary: Accept-Encoding
X-Powered-By: PHP/5.5.9-1ubuntu4.20
Vary: Accept-Encoding
X-Cache-Status: MISS
X-Handled-By: 127.0.0.1:8080
It is a MISS because the file has not been requested before. Therefore the cache server (Nginx) needed to proxy the request to the Origin Server (Apache) to get the resource. Take a look at X-Handled-By which indicates that the request has been handled by apache
Let’s try accessing the same page again
$ curl -X GET -I 127.0.0.1/index.php
HTTP/1.1 200 OK
Server: nginx
Date: Sun, 23 Oct 2016 20:53:11 GMT
Content-Type: text/html
Transfer-Encoding: chunked
Connection: keep-alive
Vary: Accept-Encoding
X-Powered-By: PHP/5.5.9-1ubuntu4.20
Vary: Accept-Encoding
X-Cache-Status: HIT
X-Handled-By: 127.0.0.1:8080
Now we can see it was a cache HIT via the X-Proxy-Cache header. We have confirmed that our cache setup is working as expected.
Let’s access test.html file and see how it behaves
$ curl -X GET -I 127.0.0.1/test.html
HTTP/1.1 200 OK
Server: nginx
Date: Sun, 23 Oct 2016 21:02:56 GMT
Content-Type: text/html
Content-Length: 122
Last-Modified: Sun, 23 Oct 2016 20:20:24 GMT
Connection: keep-alive
Vary: Accept-Encoding
ETag: "580d1b88-7a"
Accept-Ranges: bytes
From the curl output it is clear that the html file has been served directly by nginx and it has not been proxied to apache. This confirms that nginx proxies only php requests to apache and it directly servers all other files by itself.
We have successfully setup nginx as a caching reverse proxy for apache and validated the same.
Post your queries / suggestions in the comment section.

