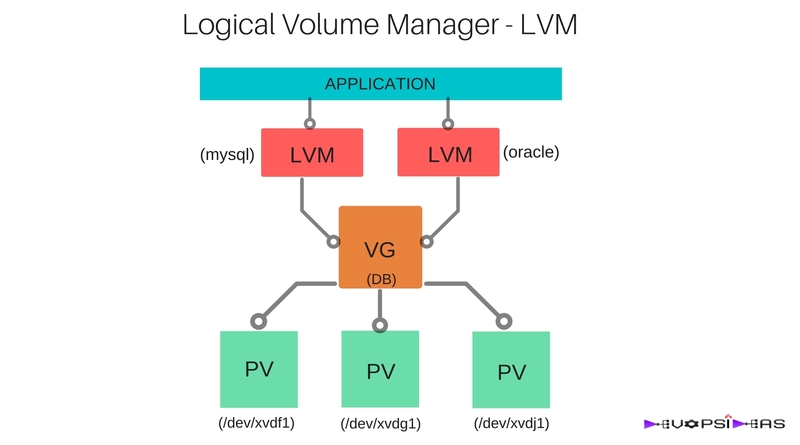
Logical Volume Manager – LVM
The Logical Volume Manager also know as LVM, provides a great amount of flexibility for applications that require expanding disk space. LVM work by creating a virtual layer of storage on top of physical devices. The OS operates against the LVM disk as if it was a regular disk. However the advantages allow us to expand the disk without having to reformat the file system or create new partitions.
Scenario
Consider that your application is using database that runs on an EC2 instance. The data is stored in EBS volumes. You application has become very popular and grows widely in turn increasing the size of your database on daily basis. You are in a situation where you need to frequently increase the size of your disk space where the data gets stored. This should be done seamlessly without affecting your application at run time.
Solution
This can be achieved easily by leveraging on Logical Volume Managers (LVMs), which provide the option to easily increase the size of their volume by adding more EBS volumes. With multiple EBS volumes, network performance is increased between EC2 instances and EBS volumes.
LVMs create an abstraction layer on top of underlying disk layouts and allows sysadmins to create virtual partitions over physical volumes. You can have multiple virtual partitions on a physical volume or a single virtual partition over multiple physical volumes. LVMs provide the ability to dynamically expand and shrink virtual partitions and make additions to physical volumes on the fly for existing LVMs.
Lets get our hands dirty and practically see how we can achieve this.
In this article we will see how to expand the disk space of the mount /var/lib/mysql where our DB gets stored. We will start by creating physical volume, volume groups and then the Logical Volume. Upon completion, we will then learn how to expand or “extend” the logical volume by attaching a new device to the volume group.
How to do it ?
We will be working on EC2 instance and EBS volume for this example. Launch an EC2 instance and attach 3 additional EBS volume (disks) to that instance. In this example, the additional EBS volumes apart from ‘/’ are given the following device names.
- /dev/xvdf
- /dev/xvdg
- /dev/xvdj
You can view your device names by listing /dev directory
Prepare the physical disks
[root@devopsideas-LVM dev]# gdisk /dev/xvdf
GPT fdisk (gdisk) version 0.8.6

Partition table scan:
MBR: not present
BSD: not present
APM: not present
GPT: not present

Creating new GPT entries.

Command (? for help): n
Partition number (1-128, default 1): <Enter>
First sector (34-41943006, default = 2048) or {+-}size{KMGTP}: <Enter>
Last sector (2048-41943006, default = 41943006) or {+-}size{KMGTP}: <Enter>
Current type is 'Linux filesystem'
Hex code or GUID (L to show codes, Enter = 8300): L
0700 Microsoft basic data  0c01 Microsoft reserved    2700 Windows RE
4200 Windows LDM data      4201 Windows LDM metadata  7501 IBM GPFS
7f00 ChromeOS kernel       7f01 ChromeOS root         7f02 ChromeOS reserved
8200 Linux swap            8300 Linux filesystem      8301 Linux reserved
8e00 Linux LVM             a500 FreeBSD disklabel     a501 FreeBSD boot
a502 FreeBSD swap          a503 FreeBSD UFS           a504 FreeBSD ZFS
a505 FreeBSD Vinum/RAID    a580 Midnight BSD data     a581 Midnight BSD boot
a582 Midnight BSD swap     a583 Midnight BSD UFS      a584 Midnight BSD ZFS
a585 Midnight BSD Vinum    a800 Apple UFS             a901 NetBSD swap
a902 NetBSD FFS            a903 NetBSD LFS            a904 NetBSD concatenated
a905 NetBSD encrypted      a906 NetBSD RAID           ab00 Apple boot
af00 Apple HFS/HFS+        af01 Apple RAID            af02 Apple RAID offline
af03 Apple label           af04 AppleTV recovery      af05 Apple Core Storage
be00 Solaris boot          bf00 Solaris root          bf01 Solaris /usr & Mac Z
bf02 Solaris swap          bf03 Solaris backup        bf04 Solaris /var
bf05 Solaris /home         bf06 Solaris alternate se  bf07 Solaris Reserved 1
bf08 Solaris Reserved 2    bf09 Solaris Reserved 3    bf0a Solaris Reserved 4
bf0b Solaris Reserved 5    c001 HP-UX data            c002 HP-UX service
ed00 Sony system partitio  ef00 EFI System            ef01 MBR partition scheme
ef02 BIOS boot partition   fb00 VMWare VMFS           fb01 VMWare reserved
fc00 VMWare kcore crash p  fd00 Linux RAID
Hex code or GUID (L to show codes, Enter = 8300): 8e00
Changed type of partition to 'Linux LVM'

Command (? for help): w

Final checks complete. About to write GPT data. THIS WILL OVERWRITE EXISTING
PARTITIONS!!

Do you want to proceed? (Y/N): Y
OK; writing new GUID partition table (GPT) to /dev/xvdf.
The operation has completed successfully.
As you can see, I have created just a single partition for the entire device for this example. You can create multiple partitions based upon your requirement.
Follow the same steps for partitioning the second device /dev/xvdg
Create Physical Volume
Now that our disks have been created correctly, we need to prepare them for use by LVM. We will use pvcreate and pvdisplay command to achieve this.
Run the below command to create the physical volume.
[root@devopsideas-LVM dev]# pvcreate /dev/xvdg1 /dev/xvdf1
Physical volume "/dev/xvdg1" successfully created
Physical volume "/dev/xvdf1" successfully created
Run the below command to display the available Physical Volumes
[root@devopsideas-LVM dev]# pvdisplay
"/dev/xvdg1" is a new physical volume of "20.00 GiB"
--- NEW Physical volume ---
PV Name               /dev/xvdg1
VG Name
PV Size               20.00 GiB
Allocatable           NO
PE Size               0
Total PE              0
Free PE               0
Allocated PE          0
PV UUID               HUratO-JjQT-QB4T-63HX-TSNx-Aofg-iw06N3

"/dev/xvdf1" is a new physical volume of "20.00 GiB"
--- NEW Physical volume ---
PV Name               /dev/xvdf1
VG Name
PV Size               20.00 GiB
Allocatable           NO
PE Size               0
Total PE              0
Free PE               0
Allocated PE          0
PV UUID               jf0clR-fFq6-ZHzq-x3HX-921V-2xlg-a1doHQ
As you can see, the two physical volumes that we created are listed in the pvdisplay command. Each device has a total physical volume size of 20 GiB.
Create Volume Group
[root@devopsideas-LVM dev]# vgcreate DB /dev/xvdg1 /dev/xvdf1
/proc/devices: No entry for device-mapper found
/proc/devices: No entry for device-mapper found
Volume group "DB" successfully created
We have named our volume group as DB. We have added the two physical volumes that we created in the earlier step as part of this volume group.
Run the below commands to view the details on volume group in that particular system.
[root@devopsideas-LVM dev]# vgdisplay
--- Volume group ---
VG Name               DB
System ID
Format                lvm2
Metadata Areas        2
Metadata Sequence No  1
VG Access             read/write
VG Status             resizable
MAX LV                0
Cur LV                0
Open LV               0
Max PV                0
Cur PV                2
Act PV                2
VG Size               39.99 GiB
PE Size               4.00 MiB
Total PE              10238
Alloc PE / Size       0 / 0
Free  PE / Size       10238 / 39.99 GiB
VG UUID               pT3zj7-Zmdi-NH2p-Pt9I-4v15-ZZvi-hm62MD


[root@devopsideas-LVM dev]# vgdisplay -s
  "DB" 39.99 GiB [20.00 GiB used / 19.99 GiB free]


[root@devopsideas-LVM dev]# vgscan
  Reading all physical volumes.  This may take a while...
  Found volume group "DB" using metadata type lvm2
As you can see from the output that we get a total Volume Group size of ~40 GiB and PE (Physical Extent) Size of 4.00 MiB. An Extent is the smallest unit of space that can be assigned to a volume group. Volume group extents are referred to as physical extents and a logical volume is allocated into sets of logical extents that are the same size as the physical extents. Thus the logical volume extents map to the physical volume extents and that is how a logical volume communicates with the physical volume data.
Create the Logical Volume
- -n (volume name)
-
-L size of the volume in bytes i.e 1M 1G 20G 1M etc.
-
-l size in physical extents. (If a physical extent is 4MiB and you want to create an 8MiB LVM volume then -l would be 2.)
Lets us create LVM named mysql from our DB Volume Group and assign it 20GB of space
[root@devopsideas-LVM dev]# lvcreate -n mysql -L 20G DB
Logical volume "mysql" created
We can view the details of LVM by typing the lvdisplay, lvdisplay -C and lvscan commands
[root@devopsideas-LVM dev]# lvdisplay
--- Logical volume ---
LV Path                /dev/DB/mysql
LV Name                mysql
VG Name                DB
LV UUID                k6M1SF-0PYU-yI0r-s8Sj-bCy9-CoSV-iJiyvV
LV Write Access        read/write
LV Creation host, time devopsideas-LVM, 2016-10-02 13:47:40 +0000
LV Status              available
# open                 0
LV Size                20.00 GiB
Current LE             5120
Segments               2
Allocation             inherit
Read ahead sectors     auto
- currently set to     8192
Block device           253:0


[root@devopsideas-LVM dev]# lvdisplay -C
  LV    VG   Attr       LSize  Pool Origin Data%  Move Log Cpy%Sync Convert
  mysql DB   -wi-a----- 20.00g


[root@devopsideas-LVM dev]# lvscan
  ACTIVE            '/dev/DB/mysql' [20.00 GiB] inherit
Create a File System and Mount the Logical Volume
Run the below command to create file system on the LVM that we created and mount it to /var/lib/mysql directory which is where our database gets stored in our example.
[root@devopsideas-LVM DB]# mkfs.ext4 /dev/DB/mysql
mke2fs 1.42.9 (28-Dec-2013)
Filesystem label=
OS type: Linux
Block size=4096 (log=2)
Fragment size=4096 (log=2)
Stride=0 blocks, Stripe width=0 blocks
1310720 inodes, 5242880 blocks
262144 blocks (5.00%) reserved for the super user
First data block=0
Maximum filesystem blocks=2153775104
160 block groups
32768 blocks per group, 32768 fragments per group
8192 inodes per group
Superblock backups stored on blocks:
32768, 98304, 163840, 229376, 294912, 819200, 884736, 1605632, 2654208,
4096000

Allocating group tables: done
Writing inode tables: done
Creating journal (32768 blocks): done
Writing superblocks and filesystem accounting information: done


[root@devopsideas-LVM mysql]# mount /dev/DB/mysql /var/lib/mysql

[root@devopsideas-LVM mysql]# df -h
Filesystem            Size  Used Avail Use% Mounted on
/dev/xvda1            8.0G  1.4G  6.7G  18% /
devtmpfs              482M     0  482M   0% /dev
tmpfs                 497M     0  497M   0% /dev/shm
tmpfs                 497M   19M  478M   4% /run
tmpfs                 497M     0  497M   0% /sys/fs/cgroup
/dev/mapper/DB-mysql   20G   45M   19G   1% /var/lib/mysql
df -h command indicates that our filesystem got mounted at /var/lib/mysql
Extending Logical Volumes and Volume Groups
Since our application became so popular, the current space allocated for DB is not enough. We got a request to increase the the disk space by another 30GB.
We can easily do this by,
- Creating a new EBS volume of required size and attaching it to our instance
- Create a PV with the newly attached device
- Add the PV as part of already created Volume Group (DB)
- Extend the Logical Volume
- Resize the filesystem for the new size to take effect.
We already have a device /dev/xvdj, which we haven’t used yet. We will use this device to extend the size of our Logical Volume and in turn the filesystem size.
Repeat the same procedure for preparing the device, creating a Physical Volume as seen above. Once creating the PV for /dev/xvdj1, we need to add it to Volume Group (DB). We will use vgextend command to achieve this.
[root@devopsideas-LVM dev]# vgextend DB /dev/xvdj1
Volume group "DB" successfully extended
We can run the vgdisplay command to verify the Volume Group details
[root@devopsideas-LVM dev]# vgdisplay -C
VG   #PV #LV #SN Attr   VSize  VFree
DB     3   1   0 wz--n- 59.99g 39.99g
We can see that the DB Volume Group size is now increased to ~60GB.
Present size of our Logical Volume “mysql” is 20 GB. We got a request to increase another 30GB to our mysql file system. We have enough space in our Volume Group now to allocate 30GB to mysql LVM. We can do this by running lvextend command.
[root@devopsideas-LVM dev]# lvextend -L +30G /dev/DB/mysql
Size of logical volume DB/mysql changed from 20.00 GiB (5120 extents) to 50.00 GiB (12800 extents).
Logical volume mysql successfully resized.
We can verify the above operation by running lvdisplay command
[root@devopsideas-LVM dev]# lvdisplay
--- Logical volume ---
LV Path                /dev/DB/mysql
LV Name                mysql
VG Name                DB
LV UUID                k6M1SF-0PYU-yI0r-s8Sj-bCy9-CoSV-iJiyvV
LV Write Access        read/write
LV Creation host, time devopsideas-LVM, 2016-10-02 13:47:40 +0000
LV Status              available
# open                 1
LV Size                50.00 GiB
Current LE             12800
Segments               3
Allocation             inherit
Read ahead sectors     auto
- currently set to     8192
Block device           253:0
Now we have everything in place and we should resize our filesystem for the changes to take effect.
[root@devopsideas-LVM linuxacademy]# resize2fs /dev/mapper/DB-mysql
resize2fs 1.42.9 (28-Dec-2013)
Filesystem at /dev/mapper/DB-mysql is mounted on /var/lib/mysql; on-line resizing required
old_desc_blocks = 3, new_desc_blocks = 7
The filesystem on /dev/mapper/DB-mysql is now 13107200 blocks long.
Lets verify whether the File sytem size got increased by running the df command.
 [root@devopsideas-LVM linuxacademy]# df -h
Filesystem            Size  Used Avail Use% Mounted on
/dev/xvda1            8.0G  1.4G  6.7G  18% /
devtmpfs              482M     0  482M   0% /dev
tmpfs                 497M     0  497M   0% /dev/shm
tmpfs                 497M   19M  478M   4% /run
tmpfs                 497M     0  497M   0% /sys/fs/cgroup
/dev/mapper/DB-mysql   50G   52M   47G   1% /var/lib/mysql
tmpfs                 100M     0  100M   0% /run/user/1001
We can see that the size of our mysql File System is 50GB. We were able to increase the size from 20 to 50GB on the fly without any downtime.
We can further add more storage to the volume group and use it for other file systems. For example, we still have 9.99GiB left in our DB Volume Group
[root@devopsideas-LVM linuxacademy]# vgdisplay -C
VG   #PV #LV #SN Attr   VSize  VFree
DB     3   1   0 wz--n- 59.99g 9.99g
Lets say, we are running Orable DB in the same server and we would like to manage it as part of LVM, we can follow the same steps that we saw above.
[root@devopsideas-LVM linuxacademy]# lvcreate -n oracle -L 9G DB
Logical volume "oracle" created.
[root@devopsideas-LVM linuxacademy]# mkfs.ext4 /dev/DB/oracle
mke2fs 1.42.9 (28-Dec-2013)
Filesystem label=
OS type: Linux
Block size=4096 (log=2)
Fragment size=4096 (log=2)
Stride=0 blocks, Stripe width=0 blocks
589824 inodes, 2359296 blocks
117964 blocks (5.00%) reserved for the super user
First data block=0
Maximum filesystem blocks=2151677952
72 block groups
32768 blocks per group, 32768 fragments per group
8192 inodes per group
Superblock backups stored on blocks:
32768, 98304, 163840, 229376, 294912, 819200, 884736, 1605632

Allocating group tables: done
Writing inode tables: done
Creating journal (32768 blocks): done
Writing superblocks and filesystem accounting information: done

[root@devopsideas-LVM linuxacademy]# mount /dev/DB/oracle /var/lib/oracle
[root@devopsideas-LVM linuxacademy]# df -h
Filesystem             Size  Used Avail Use% Mounted on
/dev/xvda1             8.0G  1.4G  6.7G  18% /
devtmpfs               482M     0  482M   0% /dev
tmpfs                  497M     0  497M   0% /dev/shm
tmpfs                  497M   19M  478M   4% /run
tmpfs                  497M     0  497M   0% /sys/fs/cgroup
/dev/mapper/DB-mysql    50G   52M   47G   1% /var/lib/mysql
tmpfs                  100M     0  100M   0% /run/user/1001
/dev/mapper/DB-oracle  8.8G   37M  8.3G   1% /var/lib/oracle
To summarize, we have seen how to create Physical Volume, Volume Group and Logical Volume Manager. We also saw how to increase the disk space without any downtime using LVM.
That’s it for this article. Hope this will be of help to someone!!

