VPNs and their Use Cases
A Virtual Private Network (VPN) provides secure, private communication over public networks, ensuring your data is encrypted and your browsing remains anonymous. While typically associated with enterprise environments, VPNs are also essential for personal use, especially when navigating the internet from public networks or accessing geo-restricted content.
For DevOps and SRE engineers, VPNs not only offer security and privacy but also provide flexibility for personal use cases, such as connecting securely from untrusted networks or accessing region-specific content when traveling. In today’s interconnected world, the ability to set up VPNs on-demand can be a valuable tool.
The Real-Time Requirement: Ephemeral VPNs for Personal Use
Imagine this scenario: You’re a DevOps engineer who frequently travels for work or leisure. Sometimes, you find yourself in situations where you need to access websites and services that are restricted to certain geographical locations (e.g., streaming services, research portals). Alternatively, you might want to secure your internet connection while working from a café or a public Wi-Fi network.
Rather than relying on third-party VPN services that may log your data or restrict access, you want to spin up an ephemeral VPN on demand, which:
- Exists only while you need it, saving costs.
- Provides secure and private access from anywhere.
- Lets you select the server location (based on the country you’re traveling in).
This solution would allow you to:
- Automatically deploy a VPN server in the country of your choice.
- Secure your connection while on public Wi-Fi.
- Tear down the server when it’s no longer needed, optimizing costs.
Planning the Ephemeral VPN Solution Using DigitalOcean
For this demo, I’ve decided to keep things simple and avoid complex tools like Terraform or Ansible for provisioning the infrastructure. Instead, I’ll be using DigitalOcean to directly run the VMs on which OpenVPN will be installed. This approach demonstrates a crucial point when evaluating any architecture: you don’t always need an elaborate, tool-heavy setup to achieve your goal.
Often, in the world of DevOps and SRE, we can get caught up in using the latest automation frameworks or orchestration tools. However, the true essence of great engineering lies in understanding the requirements and keeping the design as simple as possible while meeting the objective.
In this case, the requirement is straightforward: create a dynamic, ephemeral VPN that provides secure and temporary access, especially when traveling or working from public spaces. By using DigitalOcean and a well-crafted script, we can achieve this efficiently without overcomplicating the architecture.
The simplicity of this approach not only makes the solution easier to implement and manage but also ensures that it is highly adaptable and cost-effective. Keeping things lightweight, with fewer intermediaries, often leads to more reliable and maintainable systems. This is an important consideration for any engineer evaluating potential solutions for real-world problems.
By the way, if you’re new to DigitalOcean, you can use this referral link to get $200 in credit to kickstart your setup!
Before diving into the script, it’s important to outline the overall architecture and steps involved in spinning up an ephemeral VPN solution using DigitalOcean. This setup involves leveraging DigitalOcean’s cloud infrastructure, API integrations, and basic networking principles to dynamically create and manage VPN servers on-demand.
The goal is to make it possible to spin up VPN servers in various regions with minimal manual intervention, offering flexibility for personal use when traveling or working remotely.
Architecture Overview
Here’s a high-level overview of how this system will work:
- Client (You): The person initiating the VPN setup, typically through a terminal or an automated tool like a shell script. The client can trigger the creation, configuration, and destruction of the VPN server.
- DigitalOcean API: This API allows interaction with DigitalOcean’s cloud services. Using it, you can programmatically create and manage Droplets (DigitalOcean’s virtual private servers), which will act as your VPN server.
- Droplet Creation:
- When you want to use the VPN, you’ll initiate a request to create a Droplet in your chosen geographic region (e.g., London, New York, etc.).
- The Droplet will be provisioned with a predefined image of Ubuntu, which will host the OpenVPN server.
- SSH keys will be automatically injected into the Droplet to allow secure access for configuring the VPN.
- OpenVPN Installation:
- Once the Droplet is active, an installation script for OpenVPN will be executed. This script configures the VPN server, allowing you to establish a secure, encrypted connection from your local device to the VPN server.
- VPN Client Setup:
- After the VPN server is set up, the system will generate a default client configuration file (
.ovpn), and it’ll automatically download it to your machine locally. You can also generate additionaly profiles if need be (For eg, you can share it with your friends and family). - Using any VPN client software (such as OpenVPN or Tunnelblick), you can then import this file to connect to the VPN.
- After the VPN server is set up, the system will generate a default client configuration file (
- Ephemeral Nature:
- The VPN server is ephemeral, meaning that it is designed to exist only while it is needed. Once you’re done using the VPN (e.g., after finishing work at a coffee shop or after accessing region-restricted content), you can issue a command to destroy the Droplet, immediately freeing up cloud resources and avoiding additional charges.
- Region-Specific Servers:
- Depending on where you are or the region-specific websites you need to access, the VPN server can be spun up in different DigitalOcean data centers (e.g.,
nyc1for New York,lon1for London). This is useful for ensuring low-latency connections or accessing services restricted to certain countries.
- Depending on where you are or the region-specific websites you need to access, the VPN server can be spun up in different DigitalOcean data centers (e.g.,
- Security and Flexibility:
- Using SSH keys and the secure OpenVPN protocol ensures that your connection to the VPN server is both encrypted and authenticated. No credentials are stored in the cloud, and the VPN server is only accessible while it exists.
How to Implement the Ephemeral VPN Solution Using a Dynamic Script
Once you’ve laid out the architecture and selected DigitalOcean as your infrastructure provider, the next step is implementing the VPN solution using a simple and efficient script. Instead of relying on heavy tools like Terraform or Ansible, we’ll use a single script that interacts with the DigitalOcean API to spin up VPN servers, add users, and tear down the server when it’s no longer needed. This approach keeps things lightweight and agile, making it perfect for those quick, on-demand VPN setups.
The magic happens through a dynamic shell script—vpn_manager.sh—that simplifies everything. With just a few commands, you can provision a secure VPN server, add user profiles, and remove the VPN server when it’s no longer needed.
Options and Features of the VPN Manager Script
Script Location: https://github.com/devopsideas/ephemeral-vpn/tree/main
The vpn_manager.sh script is designed to be versatile, allowing you to perform multiple actions with minimal input. Here’s a breakdown of the key options and what they allow you to do:
Ensure you set the DO_API_TOKEN to the value of your DigitalOcean API Key before executing the script.
- Create a New VPN Server (
create_vpn):
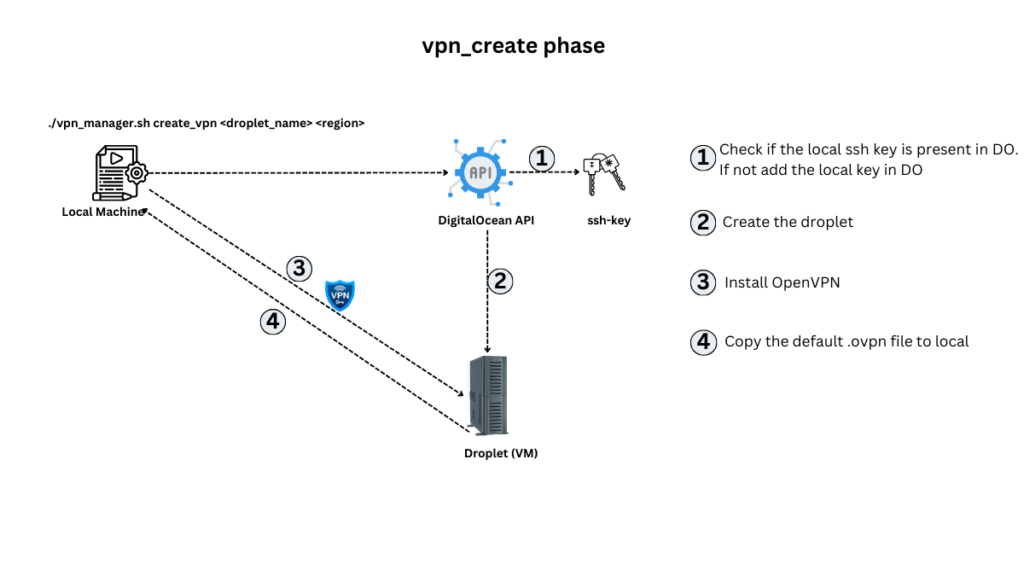
- Command:
./vpn_manager.sh create_vpn <droplet_name> <region> - What it does: First checks if your ssh key is available in DigitalOcean infra. If not, it adds your ssh key in DO through the API. It then spins up a new DigitalOcean Droplet in the region you specify, attaches your ssh key, installs OpenVPN on it, and gets it ready for secure connections. It also generates a default user profile (.ovpn) and downloads in to your local.
- Options:
droplet_name: The name of your VPN server (e.g., “my-vpn”).region: The geographic region to deploy the server (e.g.,nyc1for New York orlon1for London). If not provided, the default region will be used.
./vpn_manager.sh create_vpn personal-vpn nyc1This command will create a VPN server named “personal-vpn” in the New York region.
- List Available Regions (
list_regions):
- Command:
./vpn_manager.sh list_regions - What it does: Retrieves and displays the list of available DigitalOcean regions where you can deploy your VPN server. Example:
./vpn_manager.sh list_regionsThis will show all available regions (e.g., nyc1, lon1, sfo3) along with their names, making it easier to choose the optimal region for your VPN server.
- List Active Droplets (
list_droplets):
- Command:
./vpn_manager.sh list_droplets - What it does: Lists all currently active Droplets tagged as VPN servers, displaying their IDs, names, regions, and public/private IP addresses. Example:
./vpn_manager.sh list_dropletsThis will list all Droplets created by the script, along with useful details such as region and IP address, helping you manage multiple VPN servers.
- Add VPN Users (
create_user):
- Command:
./vpn_manager.sh create_user <droplet_ip> <username> - What it does: Adds a new user to an existing VPN server, generating an
.ovpnfile (VPN profile) for them. - Options:
droplet_ip: The public IP address of the VPN server (you’ll get this when the server is created).username: The name of the user you want to add (e.g., “john_doe”).
./vpn_manager.sh create_user 138.197.175.203 john_doeThis will create a new user profile for “john_doe” on the server with IP 138.197.175.203 and download the .ovpn file for that user.
- Delete VPN Users (
delete_user):
- Command:
./vpn_manager.sh delete_user <droplet_ip> <username> - What it does: Revokes access for a VPN user by removing their credentials and deleting their VPN configuration file.
- Options:
droplet_ip: The public IP address of the VPN server.username: The name of the user whose access you want to revoke.
./vpn_manager.sh delete_user 138.197.175.203 john_doeThis will revoke the VPN access for “john_doe” on the specified VPN server.
- Destroy the VPN Server (
destroy_vpn):
- Command:
./vpn_manager.sh destroy_vpn <droplet_id> - What it does: Tears down the entire VPN server, removing the Droplet and all associated resources.
- Options:
droplet_id: The ID of the DigitalOcean Droplet to destroy (this is provided when the Droplet is created).
./vpn_manager.sh destroy_vpn 12345678This will destroy the VPN server with the Droplet ID 12345678, saving you from incurring ongoing costs.
- Import VPN Profile (
import_ovpn):
- Command:
./vpn_manager.sh import_ovpn <ovpn_file> - What it does: Imports the
.ovpnfile (the client configuration file) into your local OpenVPN client, allowing you to connect to the VPN server. - Options:
ovpn_file: The path to the.ovpnfile generated for your VPN user. This file is downloaded when a new user is created.
./vpn_manager.sh import_ovpn john_doe.ovpnThis will import the VPN profile for “john_doe” into your OpenVPN client, allowing you to connect to the VPN server securely. You need to have openvpn client installed in your machine for this to work.
You can also use the openvpn UI client to import your profile to access the VPN.
In this scenario:
- Ephemeral Nature: The VPN server exists only as long as you need it. After using it (say, while working from a café), you can tear it down to avoid unnecessary cloud charges.
- Region-Specific Servers: You can choose a region (e.g., UK, US, or any other country) where your VPN server will be deployed, allowing you to access region-locked content.
- Secure Public Wi-Fi Access: Whether you’re traveling or working from a public location, this solution ensures that your internet activity remains secure and encrypted.
Ensure your connection is secure
After connecting to VPN, ensure that your connection is secure and that you are connected to VPN. You can run the different tests listed in Browser Leaks to validate you are not leaking any information.
Expanding the Solution into a Product
Looking ahead, this personal-use VPN solution could easily evolve into a more advanced VPN-as-a-Service product, offering features such as:
- Multi-Cloud Support: Adding the ability to spin up VPN servers across different cloud providers (e.g., AWS, GCP).
- Automated Region Selection: Allowing the service to automatically choose the best-performing region based on latency or proximity.
- User Management Portal: Creating a web-based interface for managing VPN users, server locations, and billing.
- AI Integration: Using machine learning to predict the best times or regions to spin up a VPN based on your location and usage habits.
This dynamic solution serves as a valuable launch pad for building a more comprehensive product that can cater to a wide range of users—from individuals to enterprises needing secure, on-demand VPN services. In the next stages, we’ll explore how to evolve this solution into a full-fledged product, and in doing so, gain hands-on experience with end-to-end DevOps and SRE practices. This journey will offer a well-rounded, real-time experience, allowing us to learn and implement key principles while building something practical and scalable.

