- Ansible Tutorial – Introduction and Installation of Ansible
- Ansible Configuration and Inventory files
- Ansible Local Testing: Vagrant and Virtualbox
- Ansible Ad-hoc commands usage
Ansible Tutorial – Introduction
Ansible is one of the highly used configuration management and provisioning tool along with Chef, Puppet and Salt. It occupies a major portion of Devops Tool chain and it is very essential to know how to use it in order to cater to the needs of Devops role. In this Ansible tutorial, we will go through every aspect of Ansible with real time examples.
“Infrastructure as Code” is the term used to describe managing infrastructure using code base. Ansible is one such tool by which we can manage infrastructure through code which can be versioned and re-used.
In what way Ansible is different from other tools ?
- Its easy – Ansible uses a simple syntax (YAML) and is easy for anyone (developers, sysadmins, managers) to understand. APIs are simple and sensible.
- Agentless – Ansible uses ssh to connect and execute commands. You don’t need any additional agents/softwares running in your client.
- Fast Setup – Since you don’t need to install extra agents or daemons the setup up is very simple and fast.
- Secure – Since it uses ssh for communication, it is very secure and safe. It requires no extra port or vulnerable daemons on your servers.
Control Machine
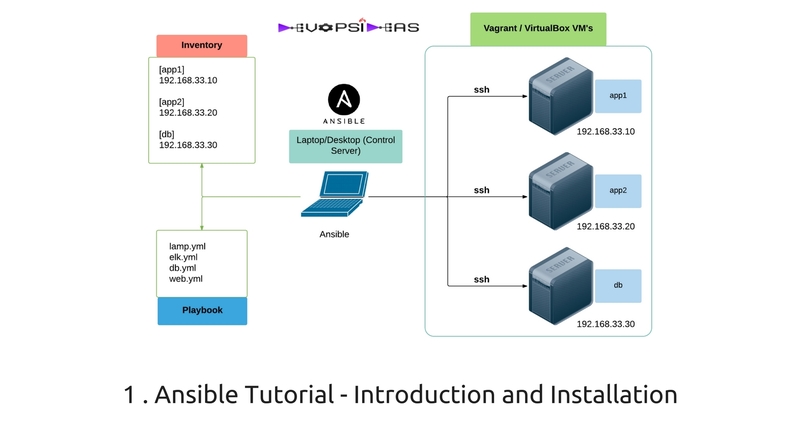
For this tutorial, we will be installing Ansible in local machine (Mac Laptop) and manage couple of VM’s configured through vagrant and Virtualbox. If you are working in an organization, it could be a separate server for Ansible workstation managing thousands of servers.
Install Ansible
Ansible by default manages machines over the SSH protocol. Once Ansible is installed, it will not add a database, and there will be no daemons to start or keep running. You only need to install it on one machine (which could easily be a laptop in our case) and it can manage an entire fleet of remote machines from that central point. When Ansible manages remote machines, it does not leave software installed or running on them, so there’s no real question about how to upgrade Ansible when moving to a new version.
The only dependency Ansible has for installation is Python. Ansible can be installed directly using OS package manager based on the OS you are running and via pip which is Python package manager.
Ansible Installation using OS Package Managers
RHEL/CentOS/Fedora:
Make sure you enable the EPEL repo before executing the below command for RHEL and CentOS.
# install the epel-release RPM if needed on CentOS, RHEL, or Scientific Linux

sudo yum install ansible
Ubuntu:
$ sudo apt-get install software-properties-common
$ sudo apt-add-repository ppa:ansible/ansible
$ sudo apt-get update
$ sudo apt-get install ansible
Mac:
For Mac, installing through pip is recommended. However, you can even install it directly using home brew.
brew install ansible
Refer Install Homebrew if you don’t have home brew installed in your Mac.
Ansible Installation using pip
Ansible can be installed via “pip”, the Python package manager. If ‘pip’ isn’t already available in your version of Python, you can get pip by
$ sudo easy_install pip
You can then install ansible by running the below command.
$ sudo pip install ansible
Note: You need to have python-setuptools installed in order to use easy_install command
Now that we have installed Ansible, in the next section, we can see how we can customize Ansible configuration and how to add hosts in the inventory file.
Important Note: All the examples in this tutorial were run against Ansible version 2.0.2.0

