Ansible Local Testing: Vagrant and Virtualbox
- Ansible Tutorial – Introduction and Installation of Ansible
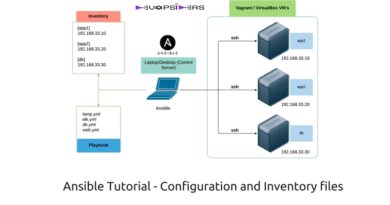
- Ansible Configuration and Inventory files
- Ansible Local Testing: Vagrant and Virtualbox
- Ansible Ad-hoc commands usage
Ansible Local Testing
Ansible works well with any server to which you can connect—remote or local. For speedier testing and development of Ansible playbooks, and for testing in general, it’s a very good idea to work locally. Local development and testing of infrastructure is both safer and faster than doing it on remote/live machine especially in production environments.
Local setup with Vagrant and Virtualbox
To do local testing of Ansible playbooks, we can use Vagrant and Virtualbox. Vagrant is easy to use local provisioning tool. Virtualbox is virtualization software ( hypervisor ). Both applications are free and open source, and work well on Mac, Linux, or Windows hosts.
To get started with your first local virtual server, you need to download and install Vagrant and VirtualBox, and set up a simple Vagrantfile, which will describe the virtual server.
- Download and install Vagrant and VirtualBox (which ever version is appropriate for your OS): – Download Vagrant – Download VirtualBox (when installing, make sure the command line tools are installed, so Vagrant work with it)
- Create a new folder somewhere on your hard drive where you will keep your Vagrantfile and provisioning instructions (Eg, mkdir ~/Ansible-Tutorial).
- Open a Terminal or PowerShell window, then navigate to the folder you just created ( cd ~/Ansible-Tutorial).
- Create the file named ‘Vagrantfile’ and add the below content
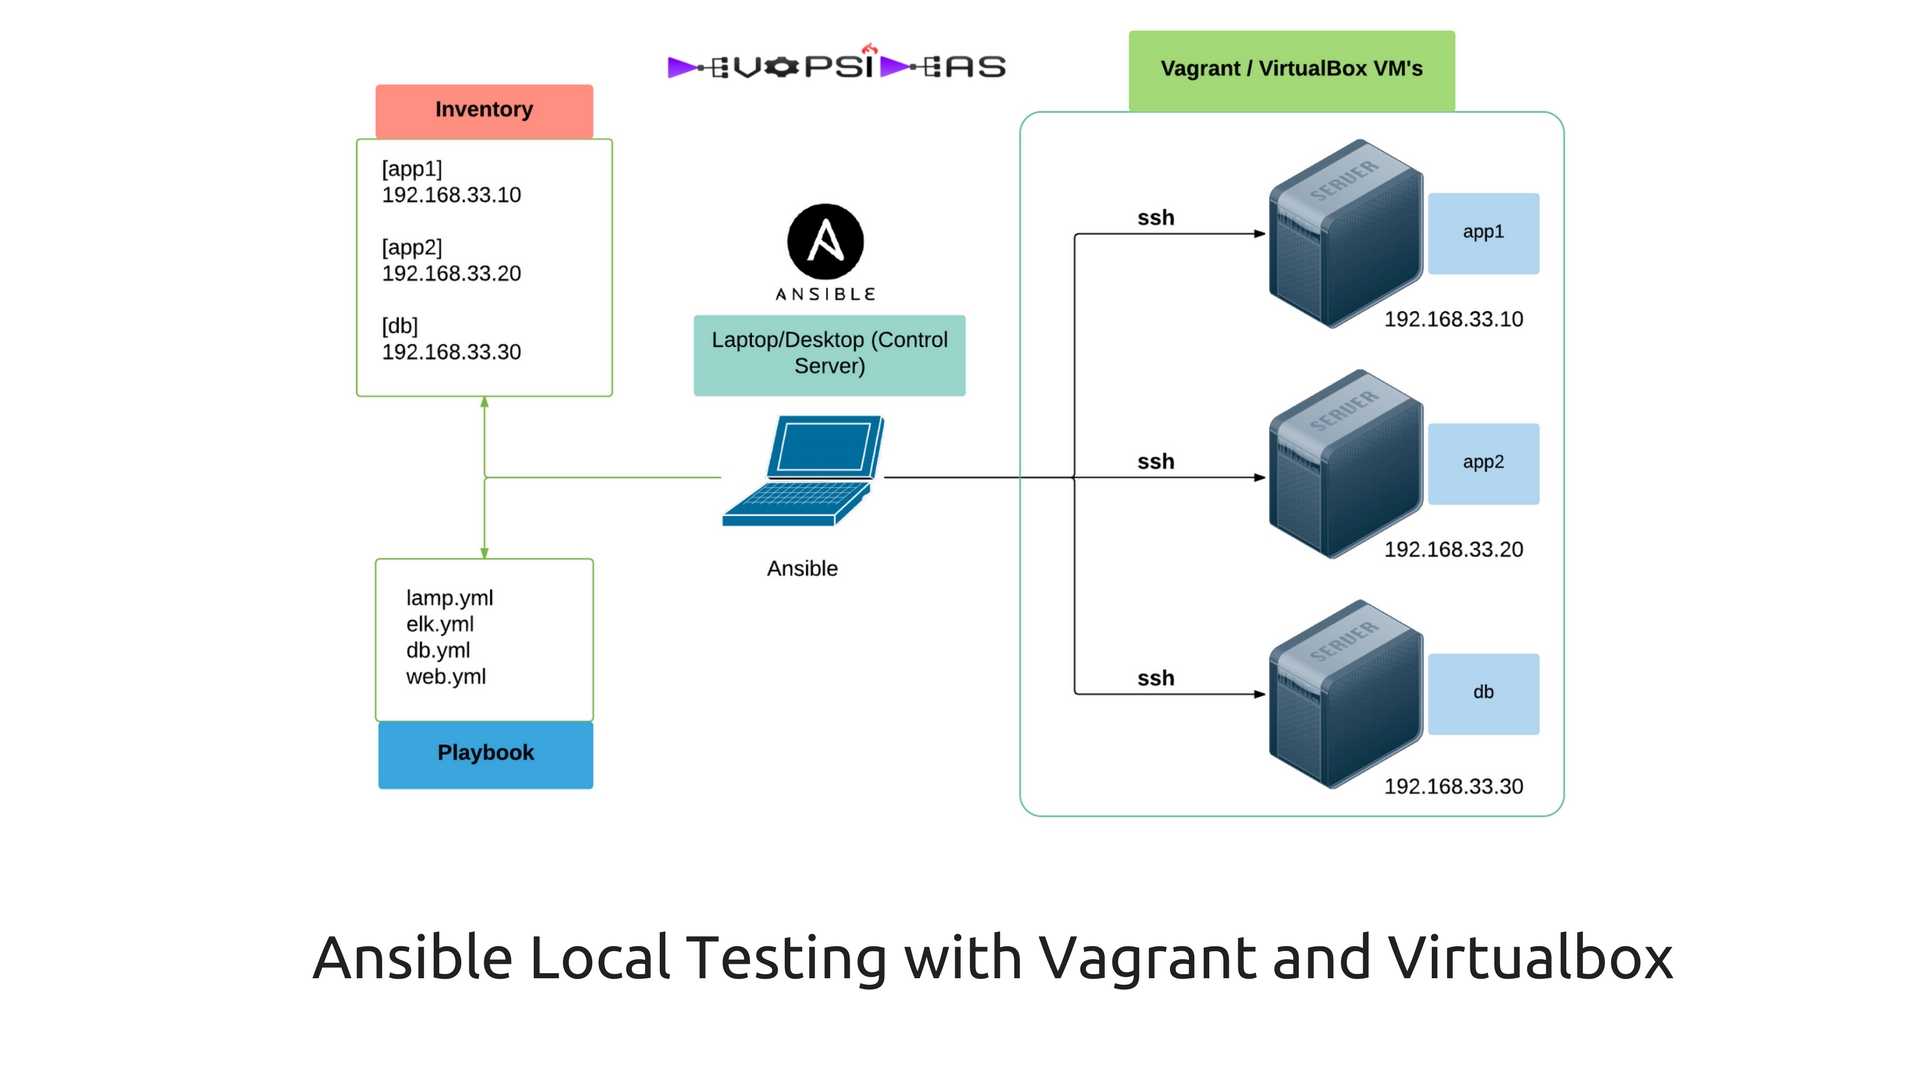
# -*- mode: ruby -*-
# vi: set ft=ruby :VAGRANTFILE_API_VERSION = "2"

Vagrant.configure(VAGRANTFILE_API_VERSION) do |config|
config.ssh.insert_key = false
config.vm.provider :virtualbox do |vb|
vb.customize ["modifyvm", :id, "--memory", "256"] end

# Application server 1.
config.vm.define "app1" do |app|
app.vm.hostname = "app1.dev"
app.vm.box = "centos/7"
app.vm.network "private_network", ip: "192.168.33.10"
end

# Application server 2.
config.vm.define "app2" do |app|
app.vm.hostname = "app2.dev"
app.vm.box = "centos/7"
app.vm.network "private_network", ip: "192.168.33.20"
end

# Database server.
config.vm.define "db" do |db|
db.vm.hostname = "db.dev"
db.vm.box = "centos/7"
db.vm.network "private_network", ip: "192.168.33.30"
end

end
- Run ‘vagrant up’ to start the VM’s
Step 4 contains the content of Vagrant configuration file ( Vagrantfile ). Explanation of the file content are as below,
- We are specifying config.vm.provider to use Virtualbox as provider.
- Further we are customizing Virutualbox VM’s with a memory of 256MB.
- We are creating 3 VM’s with the name app1, app2 and db with private ip’s 192.168.33.10, 192.168.33.20 and 192.168.33.30 respectively.
- We are setting CentOS 7 to be used as the OS defined using app.vm.box and db.vm.box. You can get the list of links to be used for various boxes here . For eg, you can use ubuntu 14.04 for one of the boxes using ‘ubuntu/trusty64‘ instead of ‘centos/7’
Now that we have running servers, we can use them just like we would any other servers, and we can connect via SSH. To connect, enter ‘vagrant ssh VM-name‘ from the folder where the Vagrantfile is located.To check the status of the VM’s run ‘vagrant status‘. You can also get the list of running VM’s by executing ‘vboxmanage list runningvms‘
Alright, we have our typical prod environment setup ready. Lets deep dive into using Ansible!!
Running your first Ansible ad-hoc command
Before executing our first Ansible ad-hoc command, we need to prepare our inventory file and also setup key exchange if you are using external servers and not your local setup.
Preparing Inventory file
As discussed in the previous article, we need to update our inventory file with the details of the servers that we created. Edit /etc/ansible/hosts file ( Or the corresponding host file as per your installation/settings ) and add the below content.
[app]
192.168.33.10
192.168.33.20

[db]
192.168.33.30
Exchanging keys and host identification for external servers
If you are following the local infrastructure setup using Vagrant and Virtualbox then you can skip this setup. If you are using external server’s ( AWS EC2, DigitalOcean droplets, Linode etc ) for this tutorial, then you need to exchange the ssh key of the user used in your Ansible server with the remote nodes that will be managed through Ansible. Also, you need to setup passwordless sudo access for the corresponding id since this will be required for installing and making changes in the remote server.
You can also work without ssh keys by using password authentication, but it is not recommended since we should avoid cases that requires manual intervention.
Also, you will be asked to verify host identification when you are connecting the server for the first time. You can disable this by setting ‘host_key_checking = False’ in ansible.cfg if you are very sure about the security of your environment.
First Ansible command
Now that we have everything in place, let’s run our first ansible command.
$ ansible app -i /etc/hosts/inventory -m ping -u vagrant
192.168.60.4 | SUCCESS => {
"changed": false,
"ping": "pong"
}
192.168.60.5 | SUCCESS => {
"changed": false,
"ping": "pong"
}
If everything is setup properly, you’ll get the ‘SUCCESS’ message after executing the above command.
Lets break down the command we executed,
- ansible – Ansible command
- app – The group name that we defined in the inventory file
- -i – Specifies that path of the inventory file ( optional if using default host file )
- -m – Indicates the module to be used. In this case we are using ‘ping‘ module
- -u – Flag to pass the user name that will be used to connect.
For password authentication instead of ssh key access, you can pass in -k flag to prompt for password.
$ ansible app -i /etc/hosts/inventory -m ping -u vagrant -k
Verbose option – You can get verbose details by passing -v flag in the ansible command. -v shows the first level, vv shows the second level and -vvv shows the third level verbose data.
$ ansible app -i /etc/hosts/inventory -m ping -u vagrant -k -vvv